Your website’s menu plays a crucial role in user experience. It guides visitors through your content and helps them find what they’re looking for quickly.
But sometimes, the default menu might not perfectly align with your website’s needs. That’s where editing your WordPress menu comes in.
In this blog, we’ll give you the two options on how to edit your WordPress menu.
Table of Contents
Why Edit Your WordPress Menu
There are several reasons why you might want to edit your WordPress menu:
- Organize Your Content: Rearrange the menu items to prioritize the most important pages and ensure a logical flow for visitors.
- Create Sub-Menus: For complex websites, categorize related pages under sub-menus to declutter the main menu and enhance navigation.
- Add Custom Links: Include links to external resources or specific sections within your website that aren’t automatically added.
- Improve User Experience: By tailoring your menu to your website’s structure, you can make it easier for visitors to find the information they need.
How to Edit Your WordPress Menu: 2 Different Ways
Editing your WordPress menu can be done through two common methods — within WordPress dashboard and within the Full Site Editor (FSE).
1. Edit Your Menu Within the WordPress Dashboard
To edit your WordPress menu through your WordPress dashboard, follow these steps:
1.1. Access the Menu Editor:
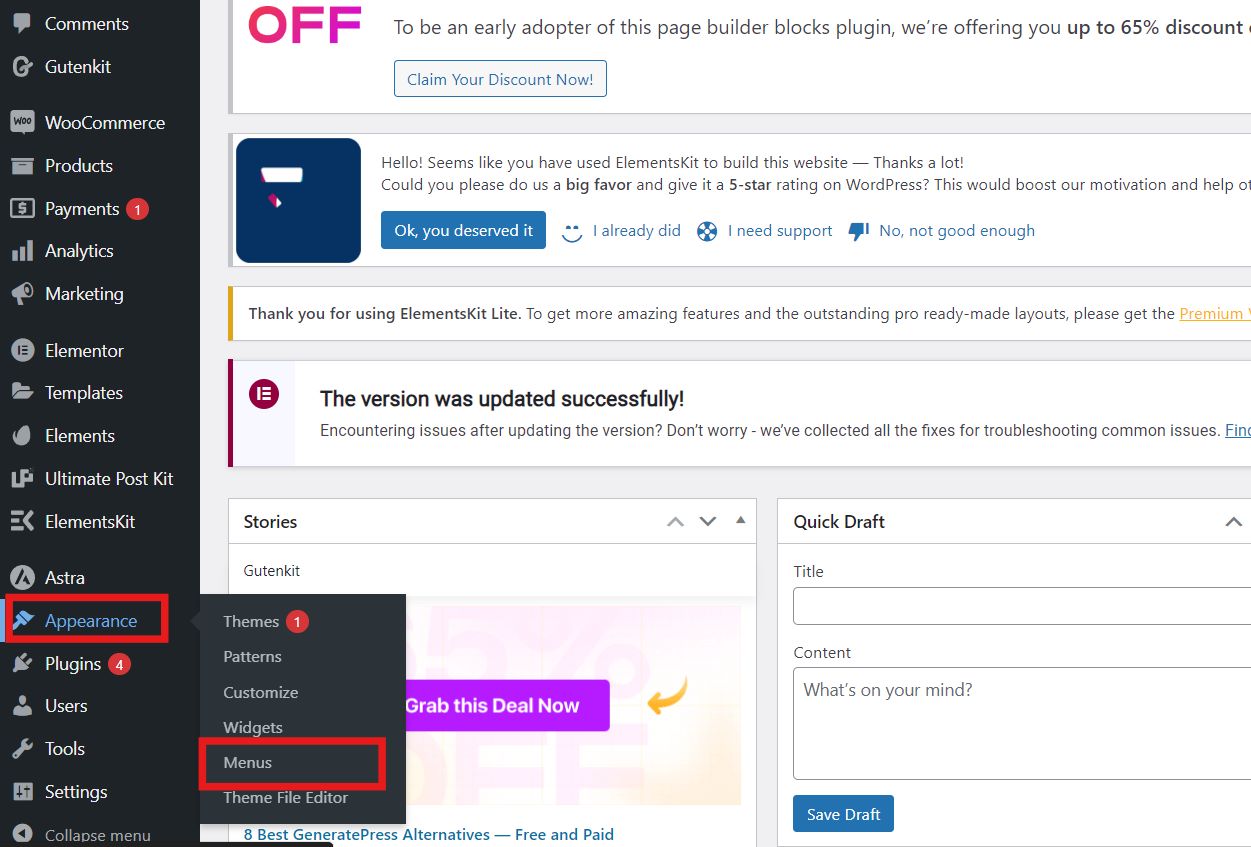
Log in to your WordPress dashboard and navigate to Appearance > Menus.
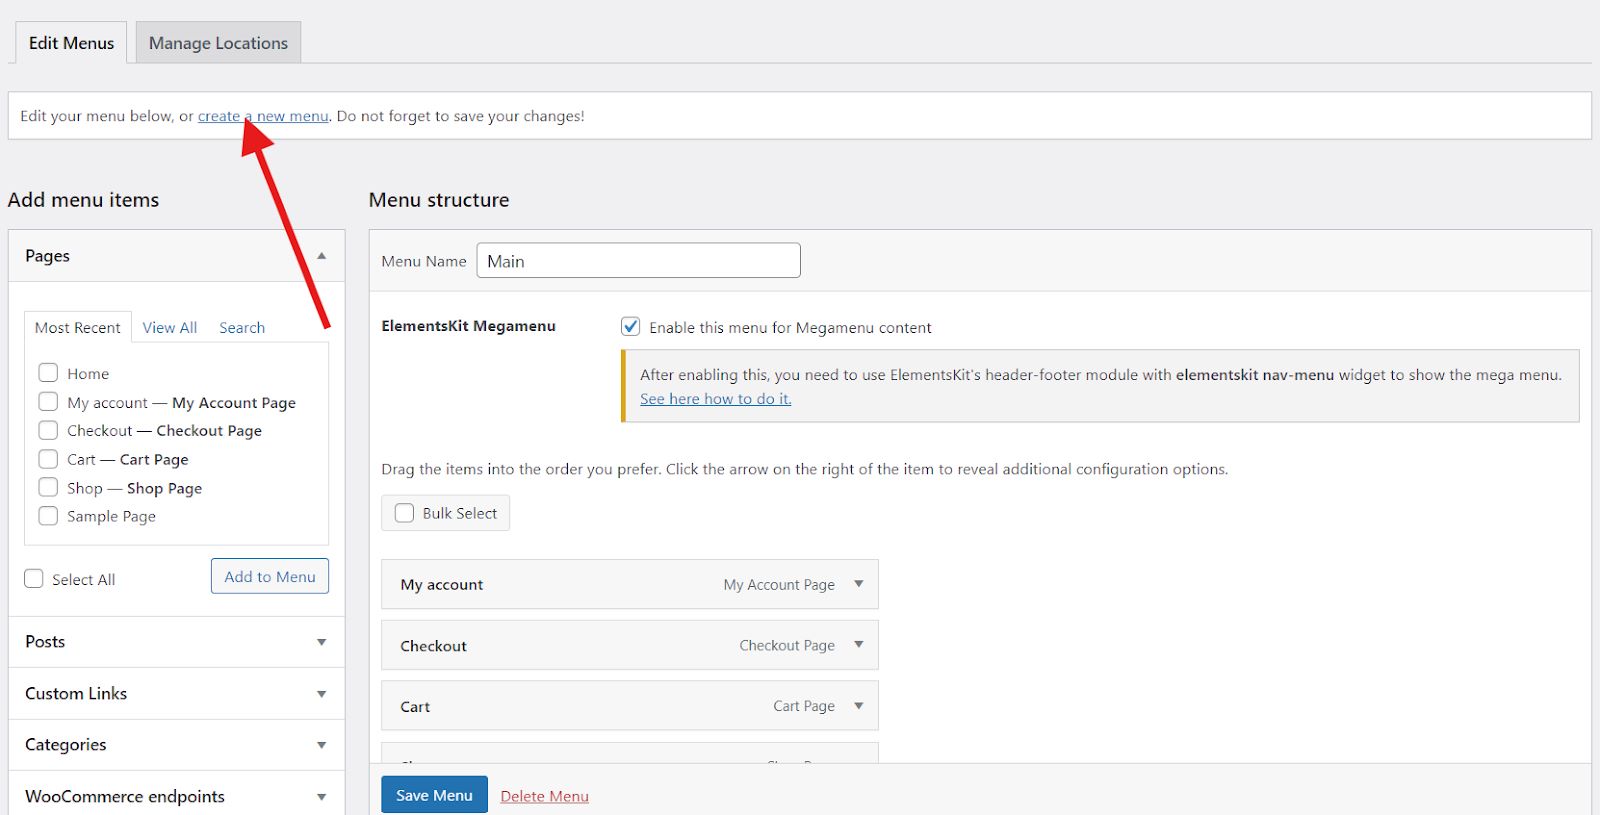
1.2. Create a Menu:
To create a new menu, click “create a new menu.”
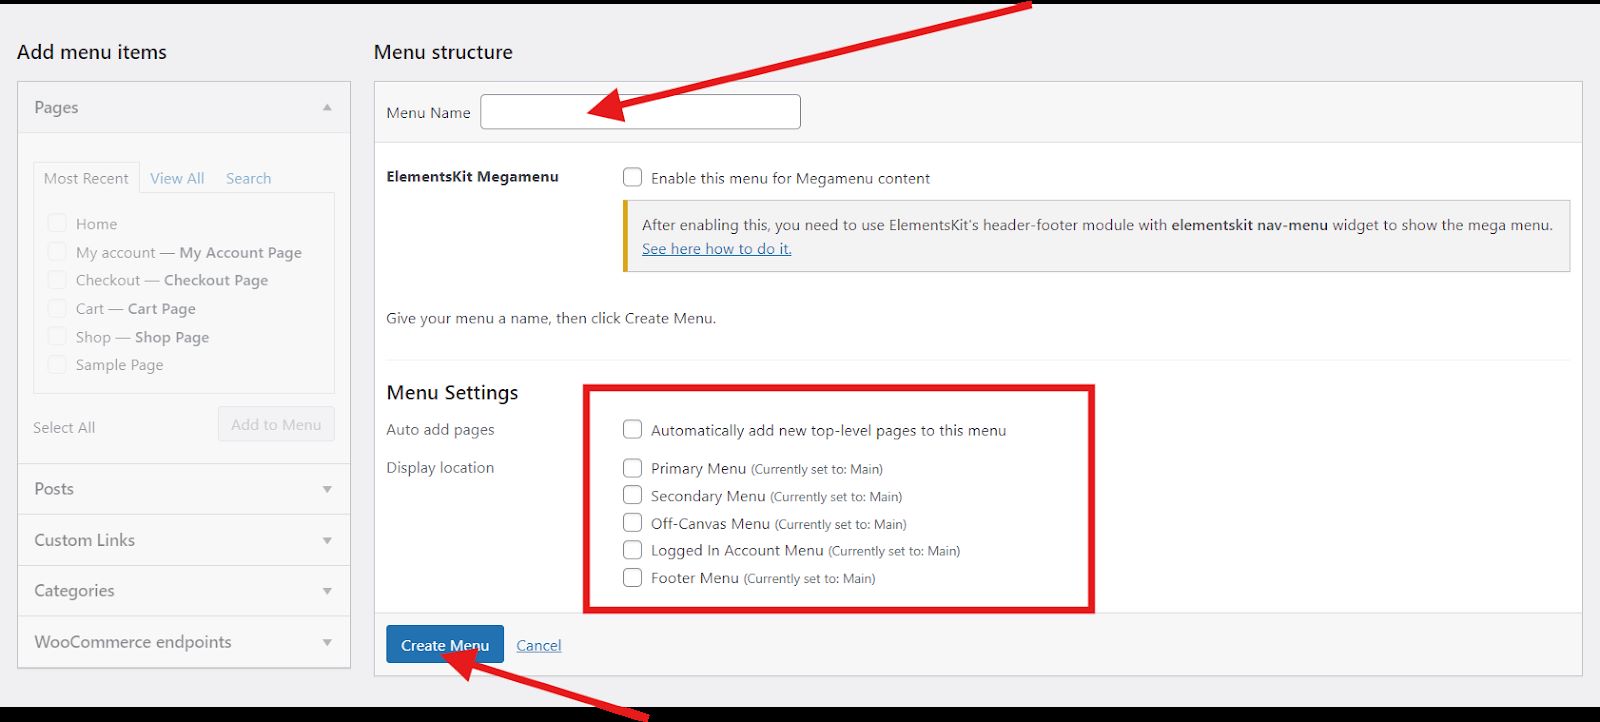
Enter the menu name and select your desired location where your menu items will be displayed. Don’t forget to click on “Create Menu.”
1.3. Add Menu Items:
In the “Add menu items” section, check the boxes next to the pages, posts, or categories you want to include. Then, click “Add to Menu” to add it in your WordPress menu.
1.4. Organize Your Menu:
To reorder the menu items, simply drag and drop them into the desired positions. To create sub-menus, drag an item slightly to the right beneath the main menu item where you want it to be nested. This slight indentation will automatically create a sub-menu structure, making your navigation organized and intuitive.
1.5. Set Menu Location:
Under the “Menu Settings” section, you have the option to choose where you would like your menu to be displayed. You can designate the menu to appear in various locations such as the primary menu, which is typically at the top of the page; the secondary menu, which may be located beneath the primary menu or in a sidebar; and the footer menu, which appears at the bottom of the page.
Select the appropriate checkboxes to indicate your desired menu placement. This allows for flexible menu navigation, enhancing the user experience across your website.
1.6. Save Your Changes:
Click “Save Menu” to finalize your edits.
2. Edit Your Menu Within the Full Site Editor (FSE)
This method applies to websites using block themes that support the Full Site Editor (FSE).
To start with:
2.1. Access the FSE:
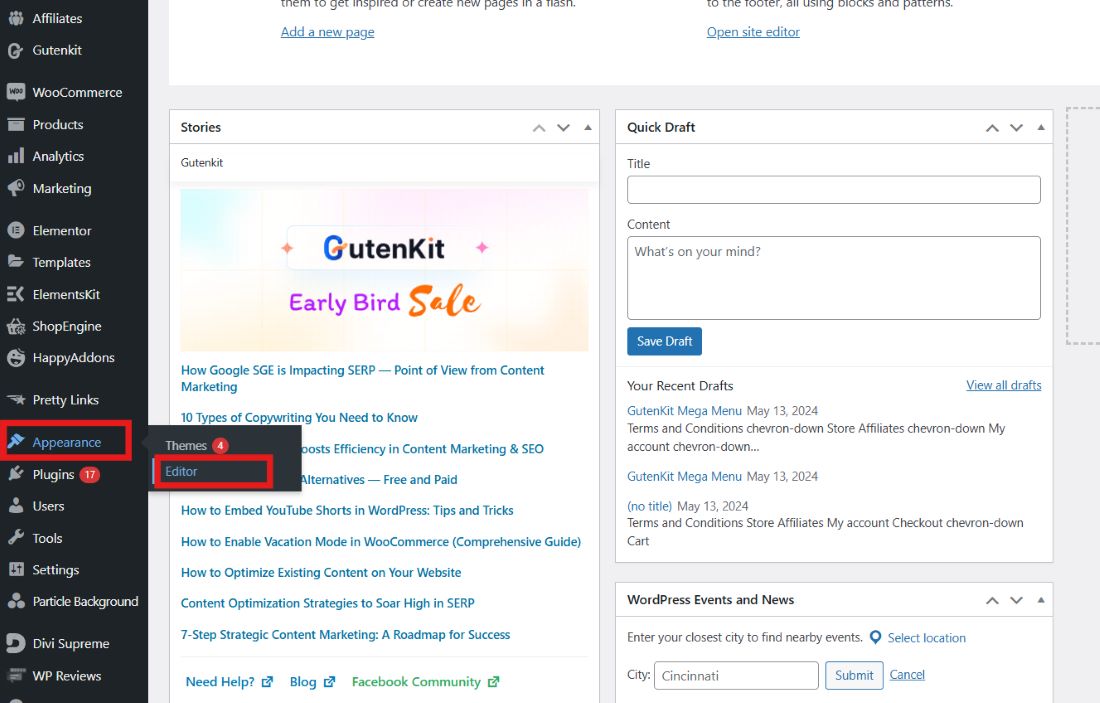
Go to Appearance > Editor.
2.2. Select Navigation:
Select the Navigation for you to get started with editing your menu.
2.3. Drag the Menu to Move it Up or Down: You can drag each menu item to rearrange them. Or, click on the 3 dots beside the item and select either move it up or down.
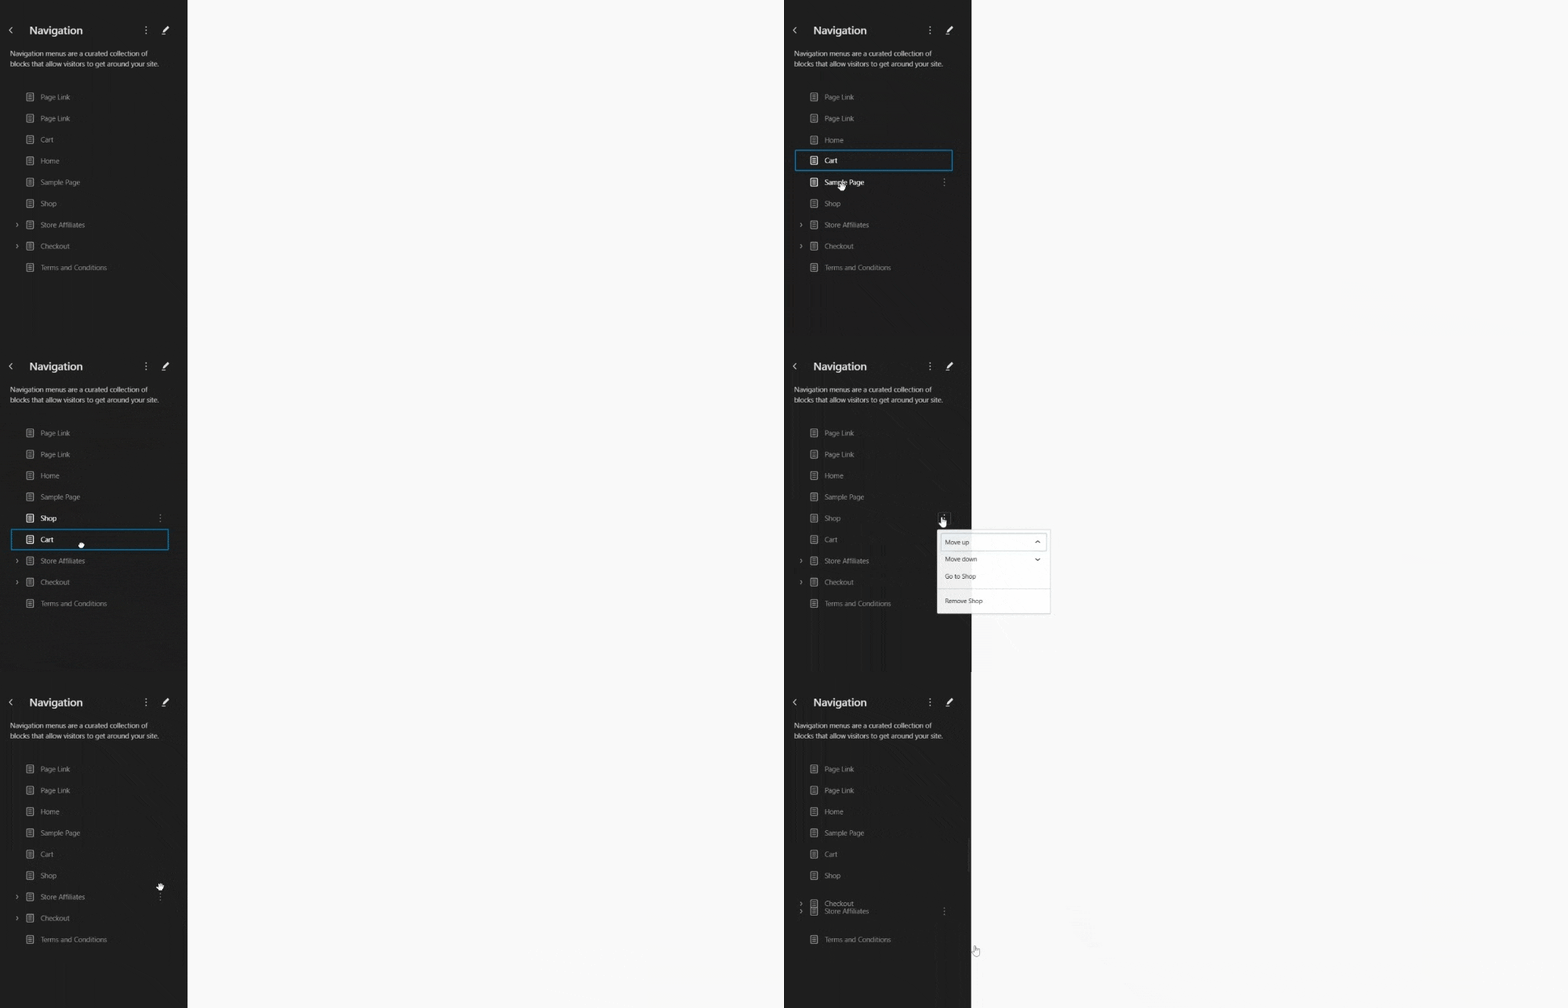
You can also apply this process in your editor screen using the side toolbar.
2.3. Edit Menu Content: Click on the pencil icon to access the editing menu.
This will display a live preview of your menu, which updates in real time as you make changes.
To add a new menu item, click on the plus icon and enter or search the URL of the page.
Let’s say you want to add the Contact page in your menu.
If you want to remove the menu item, proceed to the side toolbar and select the item. Then, click on the 3 dots.
2.4. Adding Submenu:
To add a submenu item, simply select the menu where you want to add your submenu item. Then, look for the Add Submenu icon in the toolbar usually placed beside the link icon. Enter the url or the name of the page you choose to be the submenu.
Take note that you can always change the name of your menu item through the side toolbar.
2.5. Save Your Changes:
Click the “Save” button located at the top right corner of the screen.
FAQs
Can I have different menus for different pages?
Yes, with the help of plugins or themes that support multiple menus, you can create and assign different menus for specific pages.
How do I create a custom link in my menu?
In the Menus section, use the “Custom Links” tab, enter the URL and link text, then click “Add to Menu.”
Can I include categories and tags in my menu?
Yes, you can add categories and tags to your menu by selecting them from the “Categories” and “Tags” sections in the Menus settings.
Is it possible to add custom CSS to my menu?
Yes, you can add custom CSS by navigating to “Appearance” > “Customize” > “Additional CSS” to style your menu specifically.
Can I customize the appearance of my menu?
Yes, you can use the “Customize” feature under “Appearance” to modify the menu’s design, including fonts, colors, and styles.
What should I do if my menu changes aren’t showing up?
Ensure you’ve saved your changes and cleared your website’s cache. You may restart your browser.
Final Thoughts
Editing your WordPress menu is a simple process that can significantly improve your website’s navigation and user experience. By choosing the method that best suits your theme and workflow, you can easily create a menu structure that effectively guides your visitors and keeps them engaged.
Remember, a well-organized and user-friendly menu is key to a successful website. So, take some time to customize your menu and watch your website’s navigation flourish!
Leave a Reply