No matter what kind of website you want to create WordPress is the most suitable CMS platform. Around, 43% of websites on the web are powered by WordPress.
And, one of the main reasons for this widespread popularity is that WordPress has removed the dreaded experience of creating websites for non-techies. With this spirit, we’ve made this beginner-friendly and in-depth guide on how to build a WordPress website.
How to Build a WordPress Website – 10 Simple Steps to Follow
Now, we are covering all the ins and outs of how to build your WordPress website. Just jump into the steps below:
Step 1: Get Web Hosting and Domain Name
When starting the process of building a WordPress website, your first basic steps include signing up for a web hosting service and registering a domain name. Hosting is like the surface or land on which your house is placed.
And, the domain indicates the unique address of that home. In the general web world, all the online content of your website such as code, images, videos, and text is stored by the hosting provider. Domain, on the other hand, is the name of your website that will help both human visitors and search engine bots recognize your website.
Once you’ve decided on your domain and hosting service, you’ll focus on installing WordPress. For this go to your domain dashboard and follow the next step. We’ll give you a real workaround for adding your website to a hosting server.
Step 2: Perform WordPress Installation
The hosting services, we mentioned earlier are mostly available with a one-click installation of WordPress. Therefore, if you sign up for any of them, you will land on your WordPress website with a few clicks.
Let’s see the walkthrough. We’re using a prominent hosting service, Bluehost. Complete your purchase and log in to the Bluehost Account Manager page.
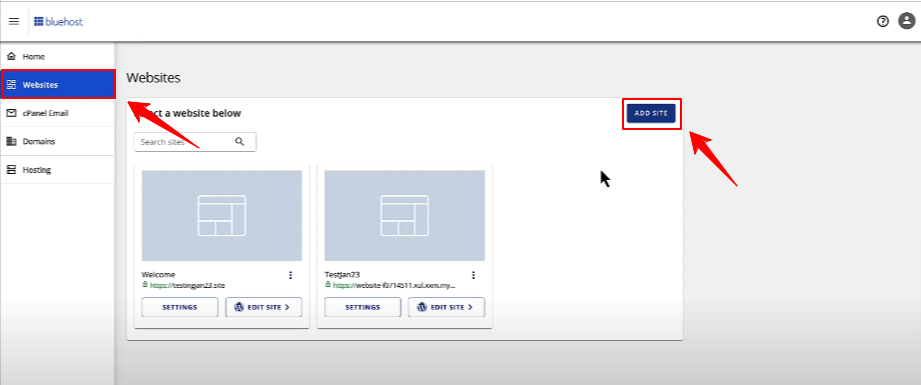
Click the Websites tab in the side navigation menu panel from your Account Manager dashboard. Then, you will see the Add Site button, hit it.
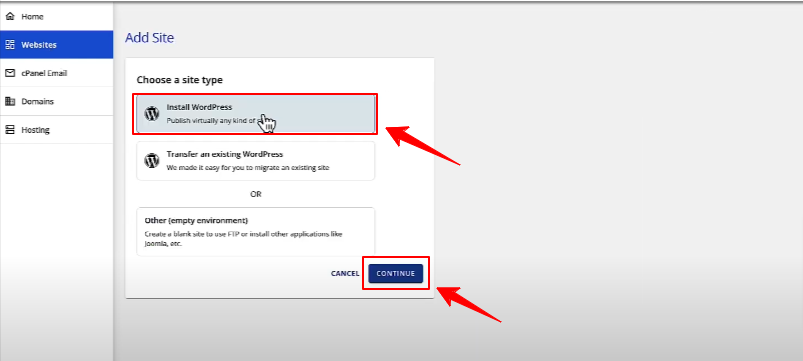
Next, select the Install WordPress option and click the Continue button.
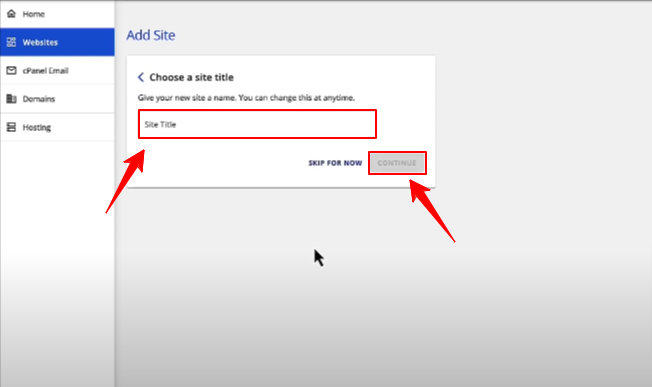
Next, enter your site title.
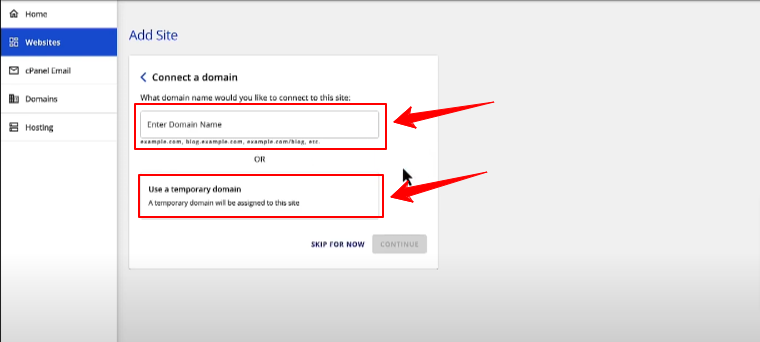
Then, you have to choose between a domain and a temporary name and hit the Continue button.
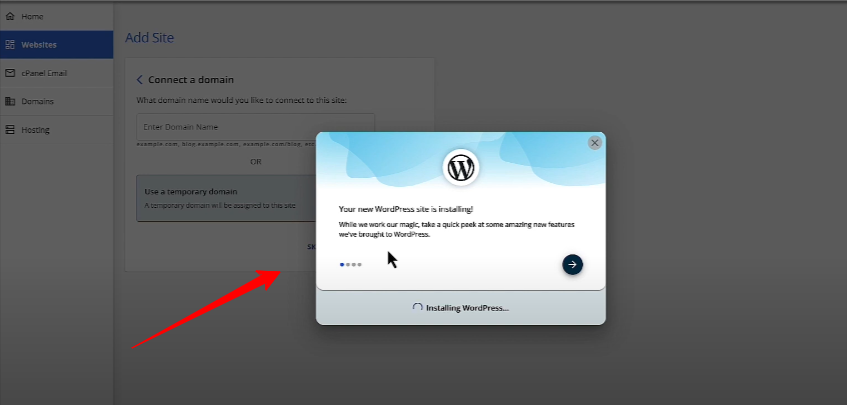
Then, you’ll see an “Installing WordPress” popup like the image above. It may take a couple of minutes. When done, you’ll see your website settings area like the image below.
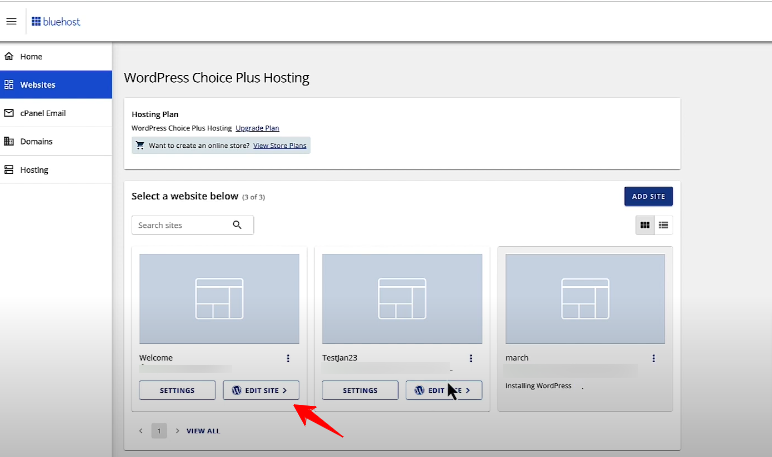
To access your WordPress admin area dashboard, you need to click the Edit Site option.
At this point, we’ll start our journey to the WordPress admin dashboard.
Step 3: Pick a WordPress Theme
As you will land on the WordPress dashboard, the first thing you need to do is pick a WordPress theme.
In general, a WordPress theme is a collection of files for managing your website’s appearance and functionalities. For example, you can control elements like fonts, colors, templates, stylesheets, menus, header, footer, etc.
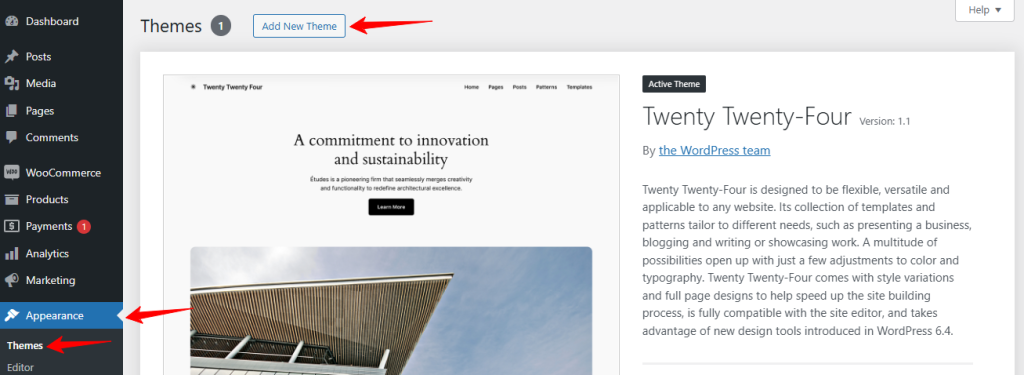
Picking up a theme from your WordPress dashboard is easy. Once you’re there, from the left panel Appearance > Themes. Doing so will take you to a new screen, where you’ll see the existing installed themes and an “Add New Theme” button at the top.
You need to hit the button to enter the WordPress theme directory. There will be thousands of theme options. Click on any of them to see the preview and details. When you find your suitable theme, just click the install and activate button.
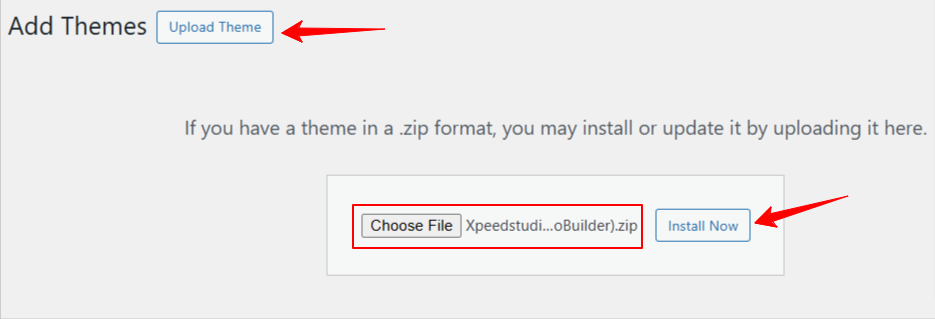
Additionally, to upload a theme file from your device, click the “Upload Theme” button and you will see the option to insert the theme file. After attaching the file, you’ll be only left with installing and activating it on your site.
Step 4: Set Up Regular Site Customization
When you are successfully done with setting up your WordPress theme, you need to go through some regular WordPress site setup. Here’s a checklist of them:
Define WP Website Title & Tagline
Your site’s title and tagline are the introductions of your website to your visitors. The title is the name of your site and the tagline is like a slogan that describes your website.
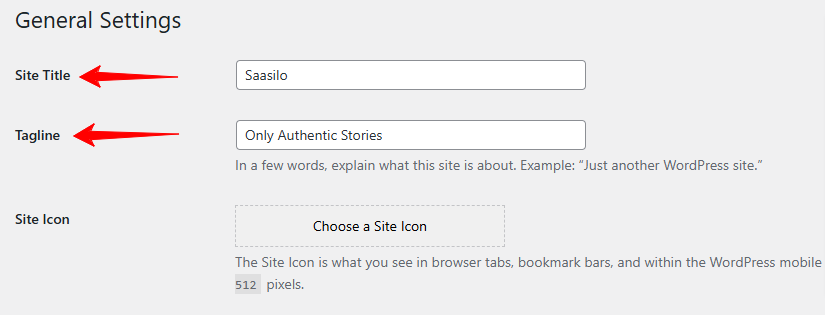
To change or edit these, go to Settings > General from your WordPress dashboard. You will see fields to enter or edit text as the title and tagline.
Customizer Overview
The WordPress customizer area is essential for revealing the look and feel of the website you want in the live preview environment. Here you’ll find settings to change website colors, change navigation, configure single post settings, set other device appearances, and more.
The WordPress Customizer settings depend on the type of theme you use:
Classic Theme
If you use a classic theme then login to your WordPress dashboard and follow Appearance > Customize. There will be a side panel with a range of customization options depending on the theme you use. For example, using a classic theme like Astra will provide you customization control for Typography, Colors, Containers, Header, Footer, etc.
Block Theme
While using a block-based theme, navigate to Appearance > Editor. It will give you access to the FSE (Full Site Editing) panel. Go to tabs like Styles, Pages, Templates, and Patterns to customize the different areas of your website.
From here, you can actually feel the true WYSIWYG editor.
Add Logo & Favicon
Logo and favicon are the crucial elements for your brand’s identity. To upload a logo and favicon, simply visit Appearance > Customize and go under the Site Identity. You’ll find the option to attach these files.
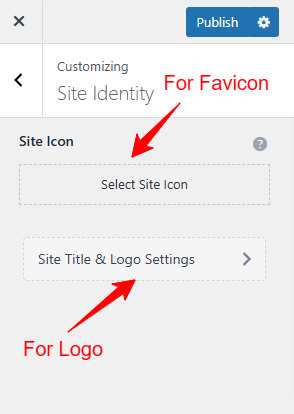
To change the logo, click the Select Logo and upload the logo file from your device. And, while adding a favicon, hit the “Select Site Icon” option and upload an image for favicon from your device.
Step 5: Add Basic Web Pages (contact, About Us, Privacy Policy)
Embedding some pages is obvious for displaying text, images, videos, and other content types on your website. Without pages, your website won’t exist.
Adding pages is easy, to add a page navigate to Pages > Add New from your WordPress dashboard. Then, you can insert content and customize it as per your brand demand.
At a bare minimum, any website should have these 5 pages:
1. Homepage: The homepage is the main page of your website that visitors encounter first. It should be designed so that users can understand the website’s purpose at a glance. For example, if you visit the homepage of Wpmet you can see all its products, achievements, and customer reviews.
2. About Page: About page is a good place to demonstrate your brand’s vision, accomplishments, history, and the team behind it.
3. Product or Service Pages: The product or service page is like the end of the funnel, it’s the place where you convert your visitors into customers.
4. Blog Page: The blog page shows the level of expertise or knowledge that you or your team possess in the niche or products. Here you can naturally promote your own product or service.
5. Contact Page: Another important page type is a contact page. Both your virtual and physical contact should shown here. So that, visitors can easily interact with you.
Apart from the above pages, there are different page types like 404 page, privacy policy page, pricing page, career page, etc. The number and types of pages on your website vastly depend on the industry you are working for.
Step 6: Set Up Site Navigation
You need to implement a powerful navigation menu system after adding website pages. A menu is like a structure that helps visitors navigate through the key areas or pages of your website.
You will insert links to important pages, categories, topics, testimonials, projects, tags, and buttons in menu items. Even, you can add custom links to your YouTube channel or social sites. A website menu is located in the header area as a horizontal bar.
Now, let’s see how to add a navigation menu in both the classic themes and block editor themes.
Adding Navigation Menu in Classic Themes
To access the menu functionality from a classic theme, navigate to Appearance > Menu. Give a name to the menu and hit the Create Menu button.
Now from the right sidebar, you can select pages, posts, custom links, categories, WooCommerce endpoints, etc, and click Add to Menu. You can also easily drag and drop these items up and down. And, you can assign some menu items as submenus under a menu item.
Whenever you’re done with the menu editing just click the “Save Menu” item to update your website menu.
Adding Navigation Menu in Block Editor Themes
In case of a block-based theme, follow Appearance > Editor. On the next page, enter the Navigation tab and click the Edit icon and you will be moving to the FSE (Full Site Editor).
Here, to add a menu item, click the “+” icon. To add a submenu, click on a menu, this will open a settings bar that allows you to add a submenu. Further, you can customize the navigation menu item, click a menu item from the block settings, and go to the Style Tab. Here, you can change the typography, size, and add an arrow.
The good thing is that all the changes you make in the block editor theme menu can be previewed in real time. Further, if you want to make your WordPress website menu more navigable, you can read this tutorial on how to create a mega menu.
Step 7: Insert Pre-made Layouts
Inserting a premade layout into your WordPress website is easy. You have to use a plugin for that. For example, if you use the GutenKit block editor plugin, it has a pre-made library.
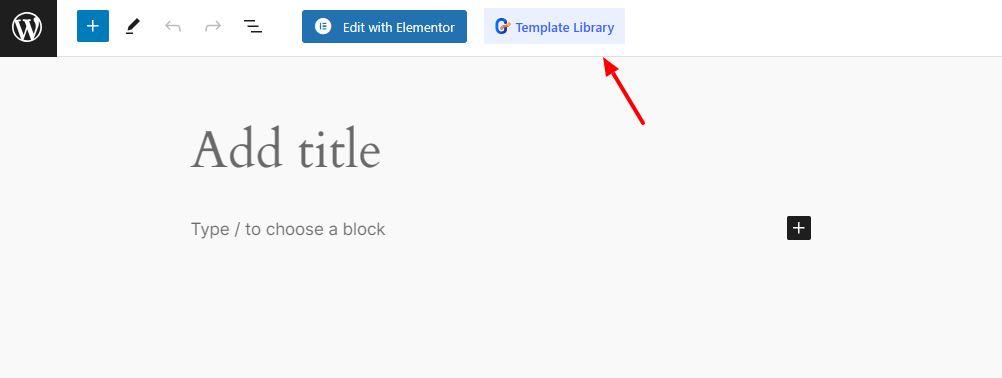
You need to add a page or start to edit a new page. At the top of the page, you will see the GutenKit Template Library option. Click on it, and the template library will open on your screen.
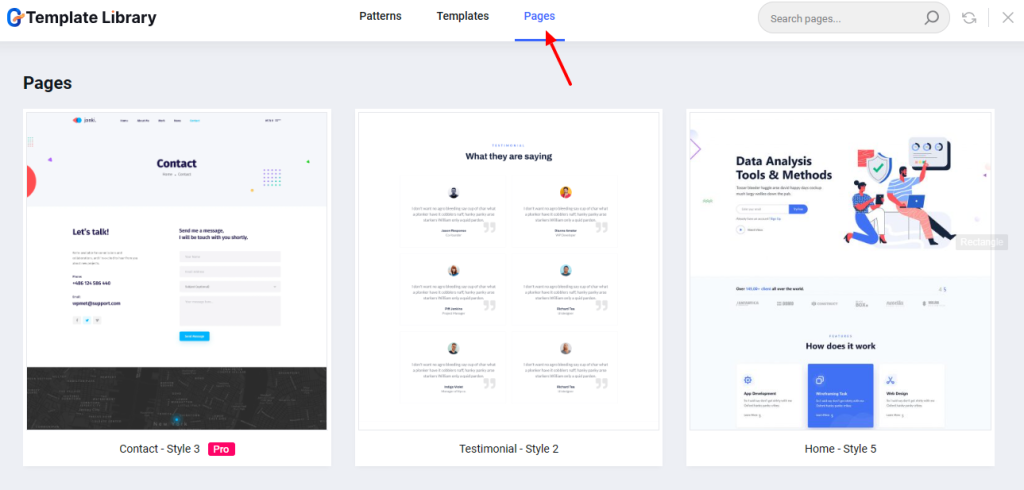
As we’re adding a page, select the Pages option. Choose any premade page template and upload it. That’s it. Now, you can add the content as you wish.
Step 8: Start Adding Your Own Content
As you continue to build your website, you must add different types of content. When you visit any website, you’ll find various blog posts and multiple pages, including landing pages, product or service descriptions, testimonials, team introductions, and more. And, these website areas contain different types of web content like text, images, video, infographics, etc.
Likewise, your website should satisfy your visitors with such informative content. But, when you start building a WordPress website, you may feel overwhelmed with the need for a large amount of content.
One effective solution to this problem is using an AI writer plugin, like GetGenie. It can fulfill all text content needs from writing catchy headlines to creating an entire blog post. Further, you can help you with writing product descriptions, feature-benefit bullet lists, video scripts, landing page copies, social media copies, FAQs, and many more.
And, you can generate visual content with the power of artificial intelligence. Using image generator plugins like Genie Image can help you get realistic images within seconds.
Step 9: Extend WordPress functionality with Plugins
Plugins help make your WordPress website more powerful and functional. There are millions of plugins to support you on any needs of your website. You can customize the appearance, combine advanced functionalities, amplify website security, get essential data, and many more.
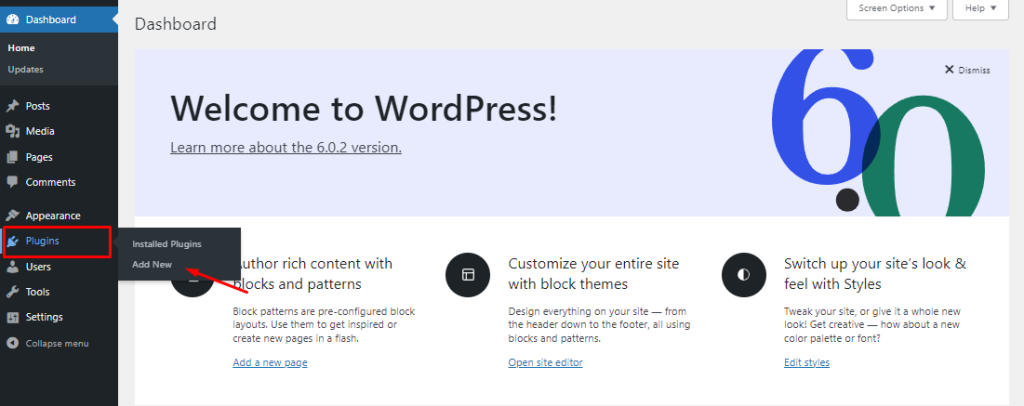
And, most of the WordPress plugins are free, just check in at wordpress.org. And, to directly install them on your website, navigate to Plugins > Add New.
But, if you want to know about some of the primary plugins you need to get started, here’s a list:
The first thing a typical WordPress user looks for is a page builder plugin. If you use a conventional page builder plugin, you can also take the help of other third-party options to empower your website functionality. For instance:
⭐ Elementor: A popular option is Elementor drag-and-drop visual page builder, which allows you to build a complete website without any coding endeavors.
⭐ ElementsKit: This plugin is an addon for Elementor to provide you with advanced features like widgets, modules, templates, animations, etc.
However, if you are a block editor user, then you must go for a block-based page builder. For this, you can install & activate GutenKit.
⭐ GutenKit: GutenKit helps you build a faster website using the WordPress block editor without any coding hassles and supports effective blocks, advanced modules, pre-made sections & templates, and many more advantages.
Apart from the page builder plugins, you also need some other kinds of plugins to help you with versatile features and functionality.
⭐ WooCommerce: WordPress has its official plugin assistance “WooCommerce” for building your e-commerce website.
⭐ ShopEngine: To elevate your WooCommere customer experience, you can use ShopEngine to make your e-commerce website more interactive and powerful with features like add to cart, wishlist, product comparison, cross-sell, variation swatches, etc.
⭐ MetForm: A professionally designed form on your website is a huge plus considering the impact on interaction with website visitors. MetForm gives a real-time preview experience of your editing to build any type of form.
⭐ EmailKit: An intuitive WordPress and WooCommerce email customizer tool to style your design templates that sync with your brand.
⭐ WP Social: Let you add various social media functionalities like social login, social counter, and social share buttons anywhere on your WordPress website.
⭐ WP Ultimate Review: Show social proof or product reviews & ratings on your website in an effortless way.
⭐ Akismet Anti-spam: Spam Protection: Easily block spam comments and spam entries in a contact form with this credible antispam plugin for WordPress and WooCommerce.
These days, AI-powered plugins are essential for cutting-edge solutions. Earlier we mentioned GetGenie – a powerful solution for creating any type of SEO-optimized content for your website and you can also check out Genie Image – which lets you create images from text-prompt with just one click.
Step 10: Publish & Promote Your Website
Your WordPress website will be visible to everyone as you publish pages or posts. But, you should test every possible thing before making your website live. Here’s a last-minute checklist:
✔️ No grammatical or spelling mistakes.
✔️ Cross-check all the internal and outgoing links.
✔️ If there is a search function, it should work properly.
✔️ Test all the integration systems.
✔️ Optimize all images and media files.
✔️ Check all the accessibility issues.
Another thing you should do is send your website link to someone like your techy friend or an expert to explore it and notify you if there are any problems.
Now, coming to your website’s visibility in SERPs, search engines typically index your site fairly quickly. But, you can do this manually by submitting your website ownership to major search engines like Google or Bing using Google Search Console or Bing Webmaster Tools.
More WordPress Website Building Tips
Apart from the above steps, we’re also including some essential tips in this how to build a WordPress website tutorial guide. Let’s read them:
Using Media Library
Click Media and the media gallery will land on your screen. From here, you can manage your site’s media. All types of media files you have uploaded to your sites can be seen from here like images, audio, videos, PDFs, Word documents, Excel Spreadsheets, PowerPoint Presentation, etc.
To upload a new media file, click the Add New Media File button. Doing this will reveal an area to drag and drop or upload media files from your device.
Set Permalinks
One important and common SEO practice is using short permalinks which also enhance user experience. Generally, WordPress website’s URLs contain the day and page or post title. But, you can easily change the permalink structure from your WordPress dashboard.
Follow Setting > Permalinks and select the Custom Structure option. Then, hit the Save Changes button at the bottom of the page. Further, you can also change the individual post or page slug while editing.
Allow or Disable Comments
Let your users comment on your page or post to enhance visitors’ interaction with your website. Or, you can also restrict them from commenting due to spam issues.
To do either of these, start editing your page or post, and go to the Discussion section dropdown. Check the box next to the Allow Comments option.
Disable Pingbacks and Trackbacks
Another favorite thing of spammers is Pingbacks and trackbacks. To disable this, visit your site’s dashboard and navigate to Settings → Discussion. Next, uncheck the option “Allow link notifications from other blogs (pingbacks and trackbacks).”
Keeping WordPress, Themes, and Plugins Updated
One of the main security measures for your WordPress website is to keep all installed themes and plugins updated with the latest version. Developers don’t only bring new features with a new version but also fix other bugs and security issues.
Share to Social Networks
A good percentage of your niche-related audience is roaming around different social sites. You’ll find groups that align with your core customer interests. You can try sharing your website links with some information and invite them to visit your website to stay updated with the latest industry news and information.
How to Choose the Best Domain And Hosting Service for Your WordPress Website?
Building your WordPress website really begins when you choose a domain name and hosting service. However, most of us are confused and clueless when looking for these. Let’s get to know them better:
Keep the following things in mind while choosing a hosting service for your website:
➡️ Purpose of Your Website: Hosting requirements for a blogging and e-commerce website will not be the same. So, think about your website needs.
➡️ Compare Hosting Provers: Just seeing an ad should not convince you of a hosting service. Rather, it’s worth comparing the hosting providers available within your budget to get the best bang for your buck.
➡️ No Compromise on Support: 24/7 dedicated support from a hosting company is obvious. For any uncertain issues or problems, you will be able to reach out to them for quick solutions. Your website cannot be out of the web world even for a minute.
➡️ Unique Selling Point: There are thousands of hosting companies. But, there is a hosting company that has tailored its services to match your main purpose.
➡️ Any Specific Locations: Some hosting providers may load your website content faster based on specific regions. This can be useful if you only target an audience group in the same location.
➡️ Speed & Security: These are the mandatory features of any hosting service. You must check the reviews of existing users for an optimum service.
Now, when you go to choose a hosting option, there are thousands! We’ll recommend you go for any globally renowned hosting services. For example:
⭐ Kinsta
⭐ Bluehost
Now coming to the domain name, you can’t just select a random name or phrase for your domain. This name influences how your customers or audience feel when they come to know your brand.
Here are some tips on choosing a domain name.
✔️ The word should be shorter in length
✔️ Choose a memorable and simple name.
✔️ Add a relevant word to your targeted niche.
✔️ Choose the domain (.com, .xyz, .org) suffix wisely.
✔️ Avoid any hyphens, numbers, or other signs.
There are many platforms available for purchasing a domain. Namecheap is a popular domain-selling platform. You can easily get your desired domain name by visiting their website. There will be a search box, enter your domain name. Once you find it just complete the purchase process.
Wrapping Up!
We hope you now have your WordPress website live and running smoothly. We’ve tried to point out all the things you need to know about how to build a WordPress website. But, one thing you must need to remember is that there’s no end to making a website.
It’s a continuous process, you need to maintain and manage your WordPress website. Plus, you should look for ways to boost your website traffic as well.
How Much Does It Cost To Build A WordPress Site?
You don’t have to spend any money to build a WordPress website except for domain and hosting prices. But, if you require some advanced functionality you need to pay for premium plugins and themes.
How Long Does it Take to Create a WordPress Website?
You can’t define an exact duration for completing a WordPress website. This may take a few minutes or several days. It depends on the requirements for your website.
Do You Need Coding Skills to Create a WordPress Website?
Provided that you are using a drag-and-drop page builder, you won’t need any HTML or CSS coding knowledge.
How Do I Create an E-Commerce Website with WordPress?
WordPress ships with its official plugin “WooCommerce” for building e-commerce websites. Plus, there are thousands of plugins and addon options to extend the shop functionality.
How to Build a Job Board Website with WordPress?
Using a job manager plugin, you can easily build a job board website within WordPress.
How to Build a Portfolio Website in WordPress?
To create a portfolio website, you can use a portfolio theme. Or, the best way is to use a page builder plugin like GutenKit and use a portfolio template to get more freedom.
Leave a Reply