Out of WordPress memory? Well, not anymore!
Experiencing WordPress memory issues is so frustrating. But, no worries — there’s an easy way to fix it! With the use of these methods, you can resolve the memory issue and put your site’s performance on track.
So, say goodbye to memory errors and hello to a smoother performance as we walk you through with the methods.
Table of Contents
What is the Memory Limit in WordPress?
The WP memory limit is the maximum amount of memory (RAM) that a WordPress script can allocate to run a website.
When a site exceeds this limit, it can cause various issues, such as:
Fatal Errors: The site may crash with error messages like, “Fatal error: Allowed memory size exhausted.”
Incomplete Page Load: Content may not load fully.
Plugin and theme malfunctions: Plugins and themes may not be functioning due to insufficient memory.
Causes of WP Memory Issues
There are factors that can contribute to WP memory and here are some:
Complex themes: These are themes that have heavy graphics, animations, custom code that consume more memory.
Resource-intensive plugins: These are plugins that perform complex tasks and consume more memory, such as image optimization or caching.
Large media libraries: Uploading and storing large numbers of images and other media files can drain memory resources.
Poorly code plugins or themes: Inefficient code can lead to irrelevant memory usage.
To avoid memory issues, watch out for these factors to ensure the website’s optimum performance.
How to Increase WordPress Memory Limit
There are 5 ways to increase WordPress memory limit, namely:
- Improve Hosting Plan
- Edit PHP.ini file
- Edit wp-config.php file
- Edit.htaccess file
- Using a plugin
Let’s discuss each of these methods:
Method 1: Improve Hosting Plan
If you’ve tried boosting your site’s memory but are still facing issues, your hosting plan may be the real bottleneck. Each plan comes with a set limit of resources, and if you’re still hitting that limit, it might be time for an upgrade.
To check your memory allocation, you can look it up on your web host’s website or hosting panel. You can also reach out to your provider for details.
If it seems like you’ve maxed out your current plan, consider moving to a higher tier or a different type of plan. For instance, upgrading from shared hosting to a virtual private server (VPS) or even a dedicated server can provide more room for growth.
Another option is switching to a new hosting provider. When evaluating options, pay close attention to the default memory allocation offered with each plan. Ideally, look for a host that provides at least 256 MB by default.
Additionally, choose a provider that allows for easy resource upgrades. This flexibility will help prevent similar memory issues as your site continues to expand.
Method 2: Edit PHP.ini file
You can try increasing the memory limit by modifying your PHP.ini file, which controls the default settings for applications that use PHP.
When a visitor accesses your WordPress site, PHP runs on the server and refers to the PHP.ini file for configuration, including the memory limit.
If your host provides cPanel, you might be able to adjust the PHP.ini settings through tools like MultiPHP Manager, MultiPHP INI Editor, or PHP Config. However, keep in mind that not every hosting provider allows access to this feature.
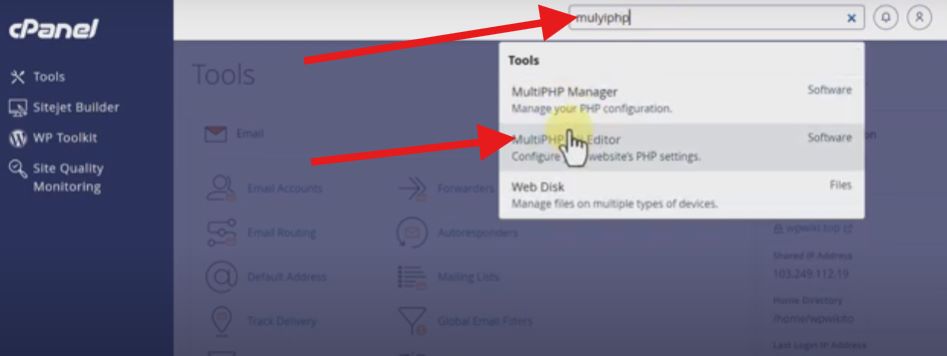
For example, you have the MultiPHP INI editor in your cPanel. You will need to login to your cPanel account and search for MultiPHP INI editor.
In the MultiPHP INI settings, select the domain, “wpwiki.top”. You’ll then find the memory limit. Edit the memory to the memory you preferred.
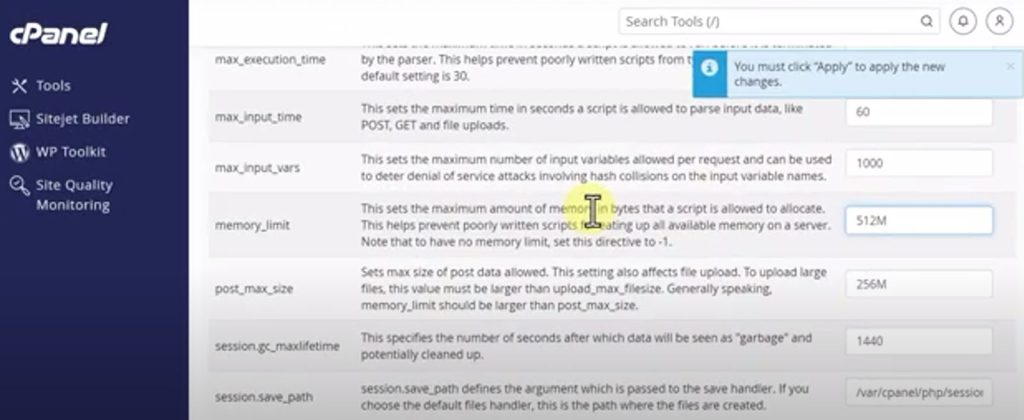
Lastly, click “Apply”. You can go back to your “Site Health” and check if the changes do apply.
Method 3: Edit wp-config.php file
If you’re running low on memory, a quick fix is to increase your available memory! WordPress allows you to set the memory limit in the wp-config.php file using the wp_memory_limit variable. However, this limit might be lower than what’s actually available through your hosting plan.
To fix this, you can edit the wp-config.php file directly. Since code-level changes carry some risk, it’s wise to create a backup of your site before making any adjustments.
To edit the wp-config.php file, connect to your server using an FTP client like FileZilla.
In FileZilla, go to File > Site Manager. If it’s your first time connecting via FTP, choose File > Site Manager > New Site.
Enter your site details along with your FTP username and password. If you’re unsure of your credentials, check your web hosting account for this information. FileZilla will then connect and display your site’s files. Navigate to the root folder:
In this folder, right-click on the wp-config.php file and choose View/Edit. This will open the file in your default text editor.
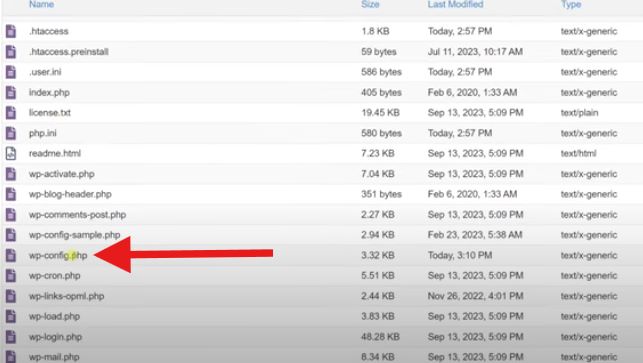
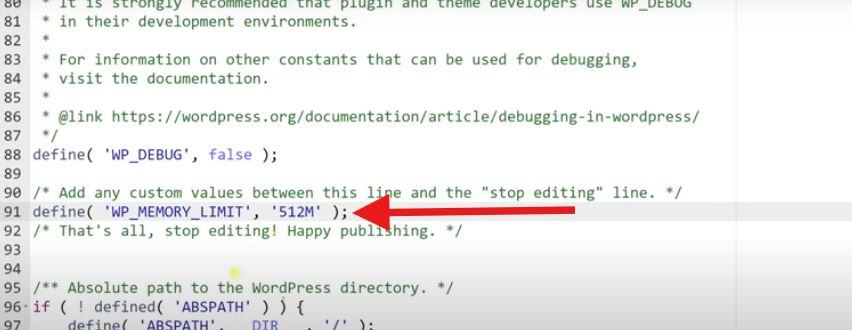
Next, look for the phrase WP_MEMORY_LIMIT. It might appear like this:
define( ‘WP_MEMORY_LIMIT’, ’32M’ );
If this line is present, simply increase the number—for example, change it from 32M to 256M.
Now, in case you cannot find the code, look for the phrase /* That’s all, stop editing! Happy publishing. */: and insert the code define( ‘WP_MEMORY_LIMIT’, ‘256M’ ); at the top.
Method 4: Edit .htaccess file
The .htaccess file plays a crucial role in configuration if your web host operates on Apache, which is common among many hosts. This file manages various aspects of your site’s configuration, including its memory limit.
By utilizing .htaccess, you can provide instructions to your server without needing to modify server configuration files directly. This makes .htaccess an excellent alternative if you are unable to access your PHP.ini file.
To access the .htaccess file, connect to your server using an FTP client. Once connected, navigate to your site’s public_html directory, where the .htaccess file is located.
Open the .htaccess file and add the following code snippet right below the # END WordPress line:
php_value memory_limit 256M
You can edit the memory number to your preferred number.
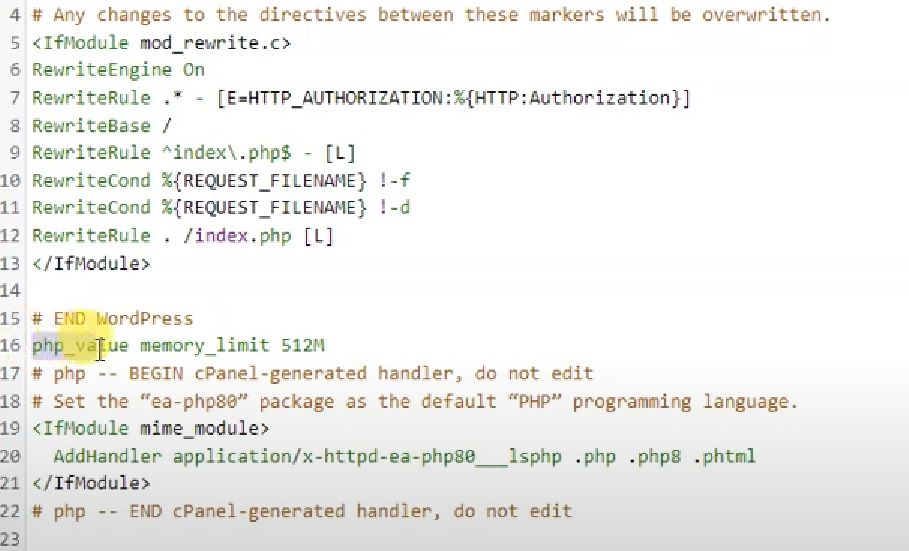
Lastly, save the changes.
Method 5. Using a Plugin
One of the most convenient and easiest ways to increase WordPress memory limit is through the use of a plugin. And so far, the recommended plugin that serves the purpose is WPMemory.
Here’s a brief overview of the plugin:
Simple installation: You can download WPMemory from the WordPress plugin repository.
Configure settings: The pro version has a wizard to help you configure the memory server.
Compatibility: Compatible with WordPress version 5.2 or higher and most WordPress themes and plugins.
In your website dashboard, look for Plugin and select Add New Plugin. Then, search for “Memory Usage, Memory Limit, PHP and Server Memory Health Check and Provide Suggestions” in the WordPress plugin repository and install it.
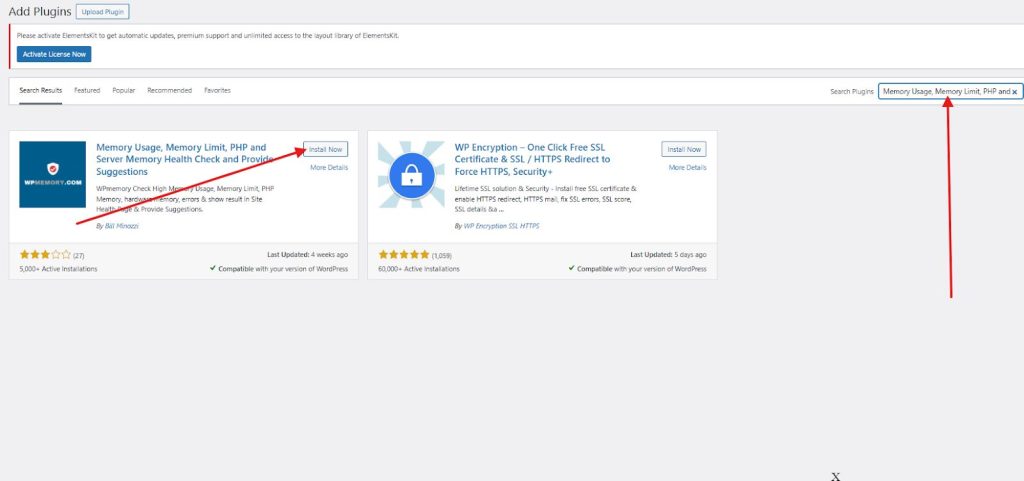
After you install the plugin, activate it.
Now, open the settings of the plugin and it will give you the memory usage of your website.
To increase the WP memory limit, upgrade to a premium plan. The pro version will give you access to the plugin’s wizard to assist you with configuring your server memory, which includes WP memory and PHP memory in just 3 steps.
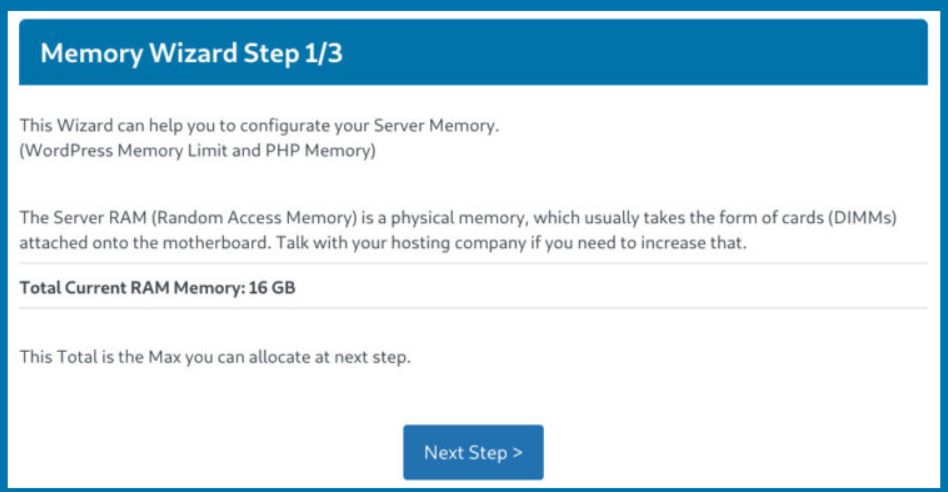
You can even decrease the WP memory limit in case the added limit is higher than the PHP memory limit. Please note that the WP memory limit should be lower than the PHP. This method of increasing memory limit doesn’t require editing any files, thus reducing any possibility of accidental file alteration.
Below is their pricing plan:

Conclusion
Increasing the WP memory limit is often necessary to ensure optimal performance and avoid errors on WordPress sites. By using a plugin like WPMemory or exploring alternative methods, you can effectively address memory-related issues and provide a better user experience.
To help you decide, here’s a quick tips:
- If you want the fastest and most convenient way, invest in a plugin.
- If you are comfortable and confident with your coding skills, you may try any of the 3 alternatives.
So, choose the method based on your skills!
Leave a Reply