Visitors follow the menu bar to navigate from one page to another. So, you must know how to add a navigational menu and what to offer for visitor satisfaction. There are several ways to add a navigation menu to your WordPress site, but many require coding skills and can be complicated.
Most WordPress users prefer simpler, hassle-free options to create their desired menu. This is why we have come out with a beginner-friendly tutorial for Elementor users to learn how to add menu to Elementor websites. You will learn to create a clear, well-organized, and user-friendly WordPress website menu.
What is a Navigation Menu on Elementor Websites?
In simple words, the navigation menu helps visitors easily access important content and explore the site. It consists of a few links, which are linked through some UI elements like text, buttons, menus, icons, etc. Most website owners navigate visitors to their main pages with menu items. They also add a button to direct users to the pricing or service pages. Even on most websites, you will see a phone or mobile icon to drive users to the contact page.
Now, coming to Elementor-based websites: If your website is built with the Elementor builder, creating and customizing your navigation menu will be much easier. You won’t have any hurdles with things like responsiveness, styling, animations, etc. Plus, you can consider using an addon like ElementsKit to extend your navigation menu functionality further.
Why Consider ElementsKit Addon for Elementor Menu?
ElementsKit ships various header and footer functionalities within their widgets and modules. You will have complete flexibility in creating a sophisticated navigational process for your website. You don’t need any coding knowledge, just play with a drag-and-drop builder interface like Elementor. Plus, you can insert header layouts from ElementsKit’s versatile library.
You can create both vertical and horizontal menus. In addition, applying animation effects and styling of submenu openings to make a website menu visually appealing is also possible with ElementsKit. Another reason ElementsKit is a great choice is that it has a dedicated mega menu widget.
No matter what type of Elementor website you have—whether it’s a news site, an e-commerce store, or anything else—you can create an effective navigation menu. You will end up building a 100% responsive menu. Further, you can have an off-canvas menu style or a simple list as a submenu in the tablet view.
How to Create a Navigation Menu on Elementor Websites?
Now let’s explore how to create a navigation menu in Elementor to ensure a seamless user experience. As we have already mentioned about using the Elementit addon for extending your Elementor website’s navigation functionalities. Before setting up your menu install and activate ElementsKit Pro.
Organizing WordPress Menu Structure
First, we’ll learn how to add a menu on Elementor websites. To start your regular navigational settings on WordPress log in to your WordPress dashboard.
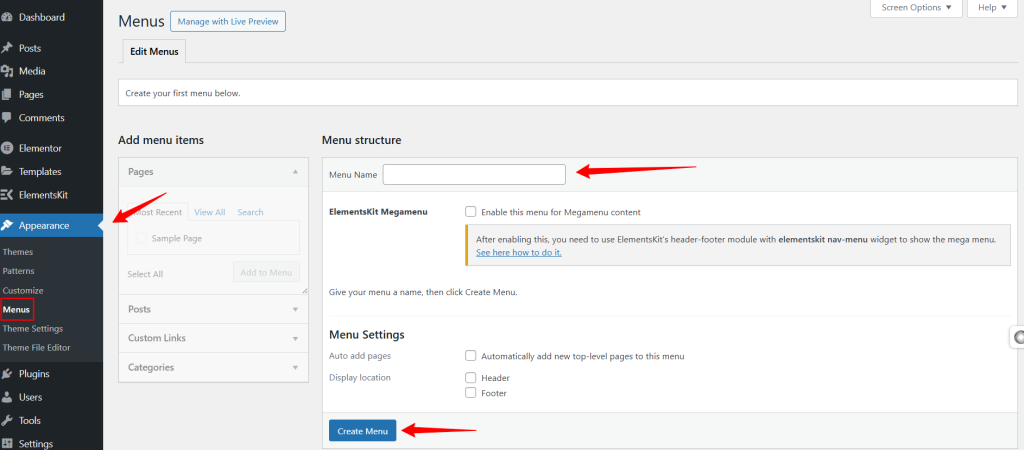
From your WordPress dashboard, navigate to Appearance> Menu. Give a name to your menu and click the “Create Menu” button.
Now, the menu settings area will be enabled for you and you can select the pages as your menu item. From the left side of this setting area, you can select the pages, posts, custom links, and categories as your menu.
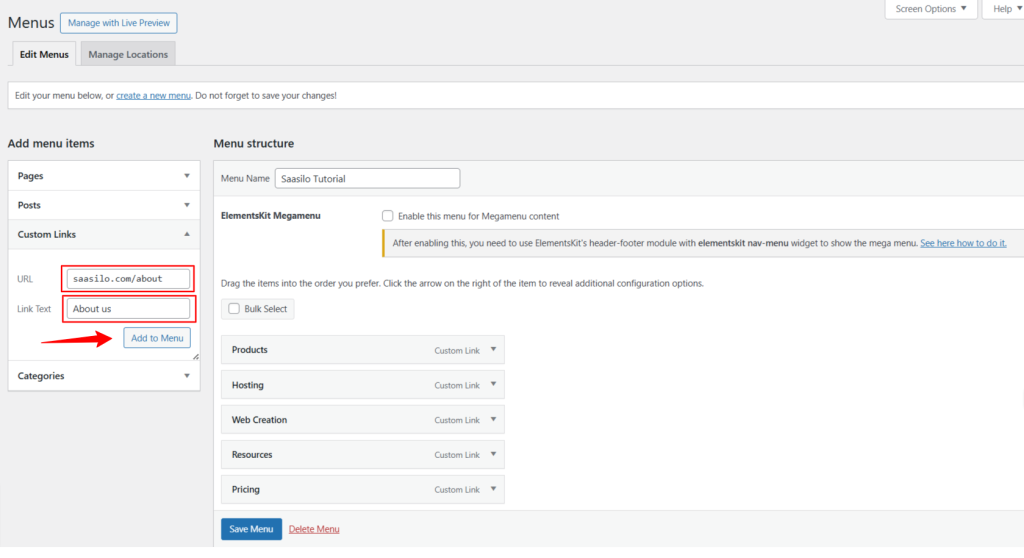
From the “View All” tab, mark the pages or posts and hit the “Add to Menu” button. Then, you’ll see them in the “Menu structure” area. Drag and place them as needed. And, click the “Save Menu” button.
When it comes to creating menus for Elementor websites, there are various types you can choose from, such as horizontal menus, mega menus, vertical menus, and more. In this “How to Add a Menu to Elementor Websites” tutorial, we’ll guide you through the process of creating these different types of menus for your Elementor site.
✨ Setting up Horizontal Menu in Elementor Websites
Here’s a simple solution to create a traditional horizontal menu for your Elementor website. The ElementsKit Nav menu widget ensures an easy setup while having drop-down functionality and customization.
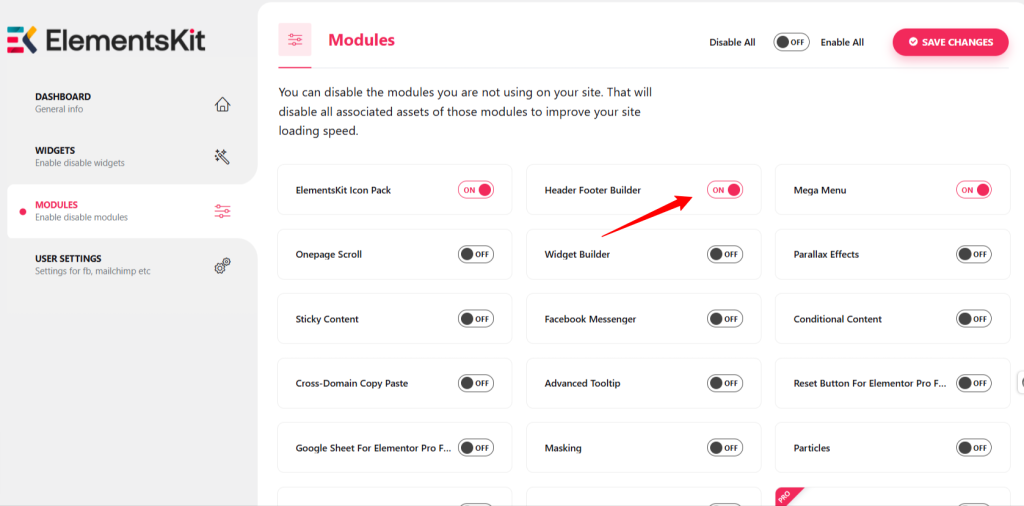
First, visit the WordPress dashboard, and follow ElementsKit > Modules. If the “Header Footer Module” isn’t enabled by default then toggle button to activate it. Then, hit the “Save Changes” button.
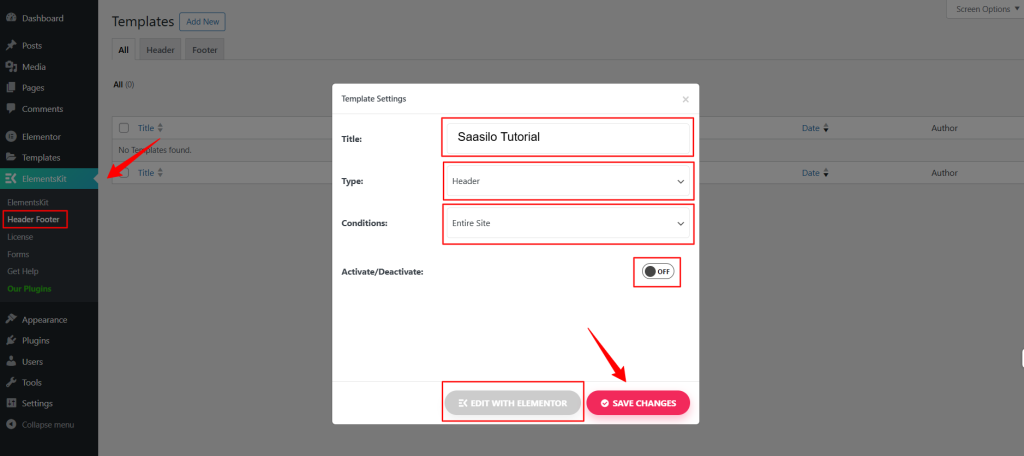
Next, follow ElementsKit > Header Footer. Then, click the “Add New” button to create a new template. You’ll see a “Template Settings” popup on your screen. Do the following changes to adjust your template settings.
- Title- Type a name for the template
- Type– Header
- Conditions– Entire Site or you can choose pages or archive.
- Toggle the button next to Activate/Deactivate.
Then, click the “EDIT WITH ELEMENTOR” button. Doing this will load the Elementor builder interface before you. Now search and insert the ElementsKit Nav Menu widget.
Go to its, Widget settings and from the Content tab:
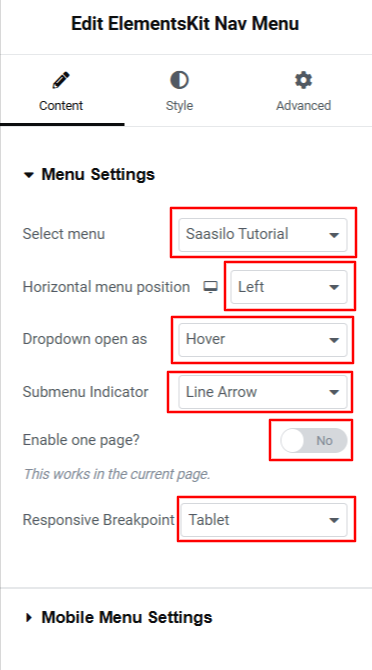
- Select your site navigation menu.
- Define horizontal position.
- Choose dropdown opening effects.
- Submenu indicator icon, responsive indicator icon, and many more.
Next, you will move to the Style tab, and from here you can customize wrappers, items, submenus, hamburger mobile menus, etc.
✨ Building Mega Menu in Elementor Websites
To build a mega menu on your Elementor website, go to your WordPress dashboard. Navigate to Appearance> Menu.
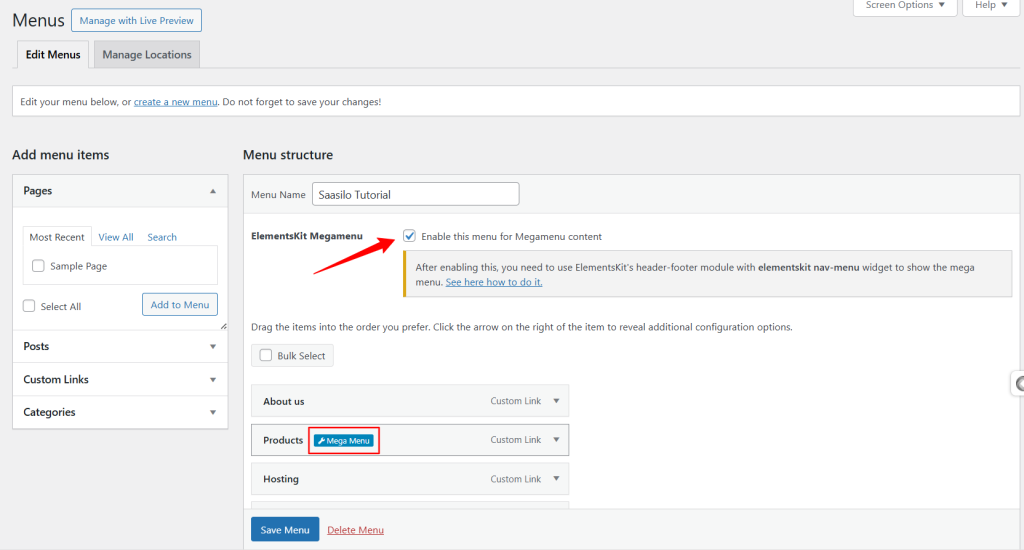
Now look underneath the menu name, and tick the box next to the “Enable this menu for Megamenu content” option. Doing so will make all the ElementsKit features available for you to build and customize the menu of your Elementor website.
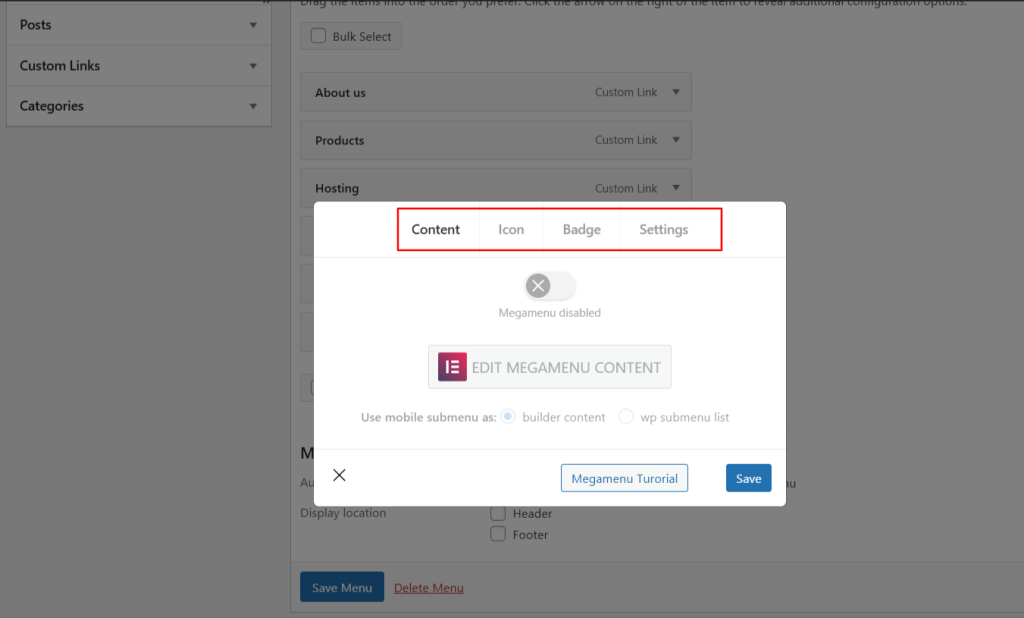
Hove over any menu item and you will see the “Mega Menu” tag. Clicking it will pop up a Mega Menu settings area. In the Content tab, click the “Megamenu Enabled” toggle button to enable the “Edit Megamenu Content” option. And, clicking this button will launch the mega menu builder area on your screen.
Here, you can build the mega menu from scratch or choose a template to add the mega menu to your Elementor website quickly. Once done, you can save and come back to the “Mega Menu” settings popup.
You can also configure the other tabs like Icon, Badge, and Settings to apply other functions of your mega menu.
✨ Creating Vertical Mega Menu in Elementor Websites
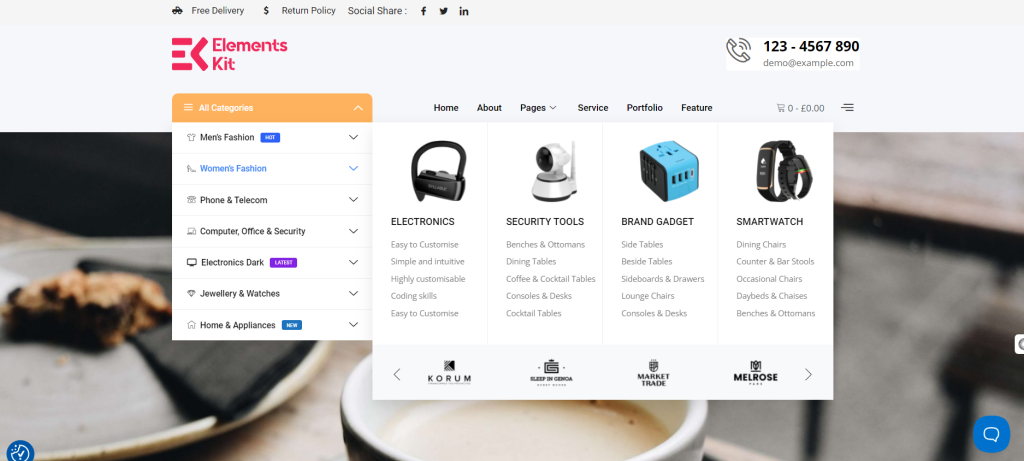
Creating a vertical menu on your Elementor websites is easy if you are an ElementsKit addon user. It has a dedicated widget for this purpose.
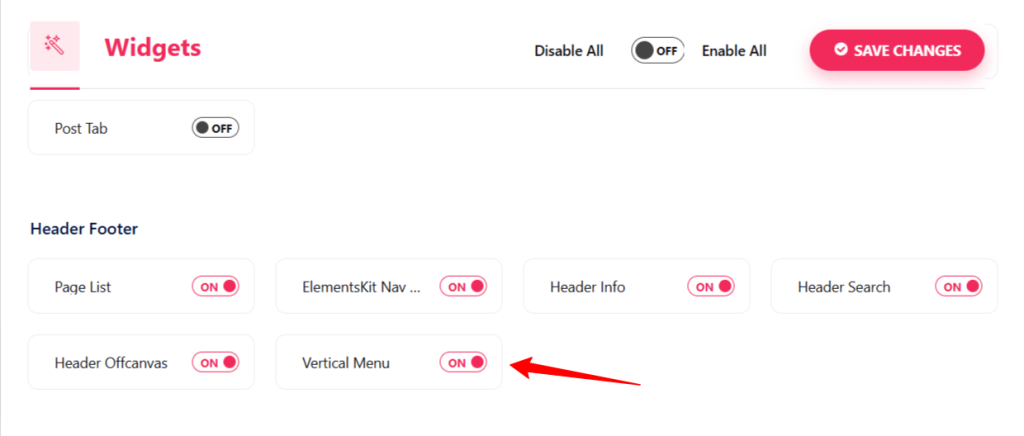
From your WordPress dashboard, navigate to ElementsKit > Widget and toggle the Vertical Menu widget. And, hit the “Save Changes” button.
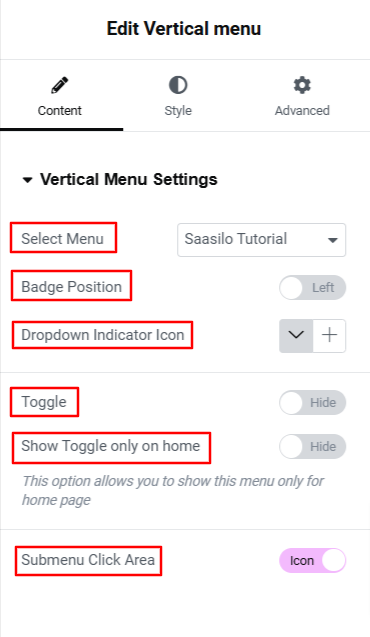
Then, you have to set your mega menu like the previous method. And, start editing your WordPress menu with Elementor builder. Insert the Vertical Menu widget using ElementsKit and select your menu in the Content tab. You will see the menu in the editor screen.
From the content tab, you can also configure the vertical menu’s badge, dropdown indicator icon, toggle, title, etc. And, the Style and Advanced tabs bring more features to bring an attractive and user-friendly vertical navigation system for your Elementor website.
The Importance of a Seamless Navigation Menu on Elementor Websites
A seamless navigation system is crucial for a WordPress website for several reasons:
👉 Having a smooth navigation system on your website ensures visitor satisfaction as they can find their desired pages with an efficient browsing experience.
👉 Since users can roam around the website spontaneously, it inspires them to stay longer and improve the visitor experience.
👉 A well-designed navigation menu reduces visitor frustration by eliminating any difficulty in finding information, which reduces bounce rates.
👉 You can place a purchase now or buy now button on the menu, which helps to get faster conversions.
👉 Improved navigation enhances your site’s visibility in search results, leading to better SEO performance.
👉 A well-structured navigation menu reflects professionalism, boosting your website’s credibility and trustworthiness.
Bonus Tips to Improve Your Elementor Navigation Menu!
The navigation menu is one of the most tactical elements on your website. It will have a significant impact on achieving your goals and boosting revenue. Most visitors start taking their journey with menu navigation. Here are some expert recommendations to strategically approach your WordPress navigation menu.
✅ Identify the essential pages your visitors need and link them to your menu items for interactive and effortless navigation.
✅ Create an interactive experience by applying hover animations and color changes to make the menu more attractive.
✅ Choose a menu type that best suits your website’s navigational needs.
✅ Ensure your menu is fully responsive, and consider creating separate menus tailored for different devices.
✅ Keep your menu sticky or always visible so that visitors can see it while scrolling.
✅ Structure your submenu and subcategories in a logical, hierarchical order to ensure smooth navigation.
Wrap Up!
As you have learned how to add menu to Elementor websites, It’s your turn to create and customize it for your website. And, with ElementsKit, you will have versatile features and functionalities. So do play around with your Elementor website menu and get creative.
Leave a Reply