A well-structured navigation menu is crucial for any WordPress website. It guides visitors through your content and helps them find what they’re looking for quickly and easily.
But how can one display a new page in the WordPress menu?
Let’s find out! This guide will explore two proven methods for adding new pages to your WordPress menu.
Table of Contents
How to Add a New Page to Menu in WordPress
Adding a new page to the menu in WordPress can be done in 2 methods: via the menu appearance settings and via the site editor.
So, let’s find out how these two methods work!
Method 1: Linking a New Page via the Menu Appearance Settings
Linking a new page via the menu appearance settings is the traditional method for adding pages to your menu. Here’s how to do it:
Step 1: Create a New Page (optional)
If you’ve already created the page, ignore this step.
But if you haven’t, let’s go through how to do that. First, in your WordPress dashboard, go to Pages and select Add New Page.
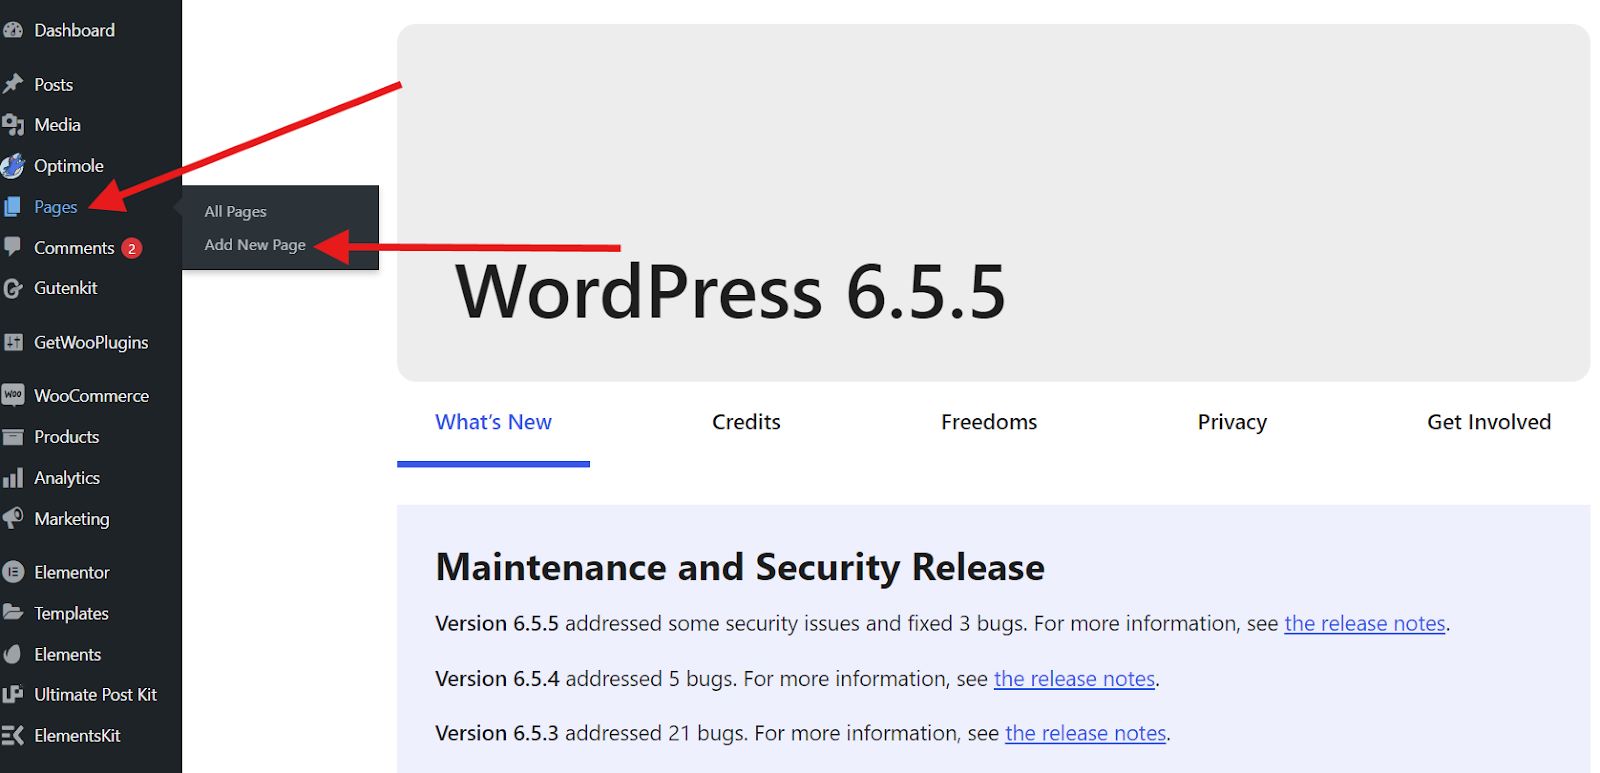
Craft your page content, including the title, body, and images. Once satisfied, hit Publish.
Step 2: Navigate to Menus
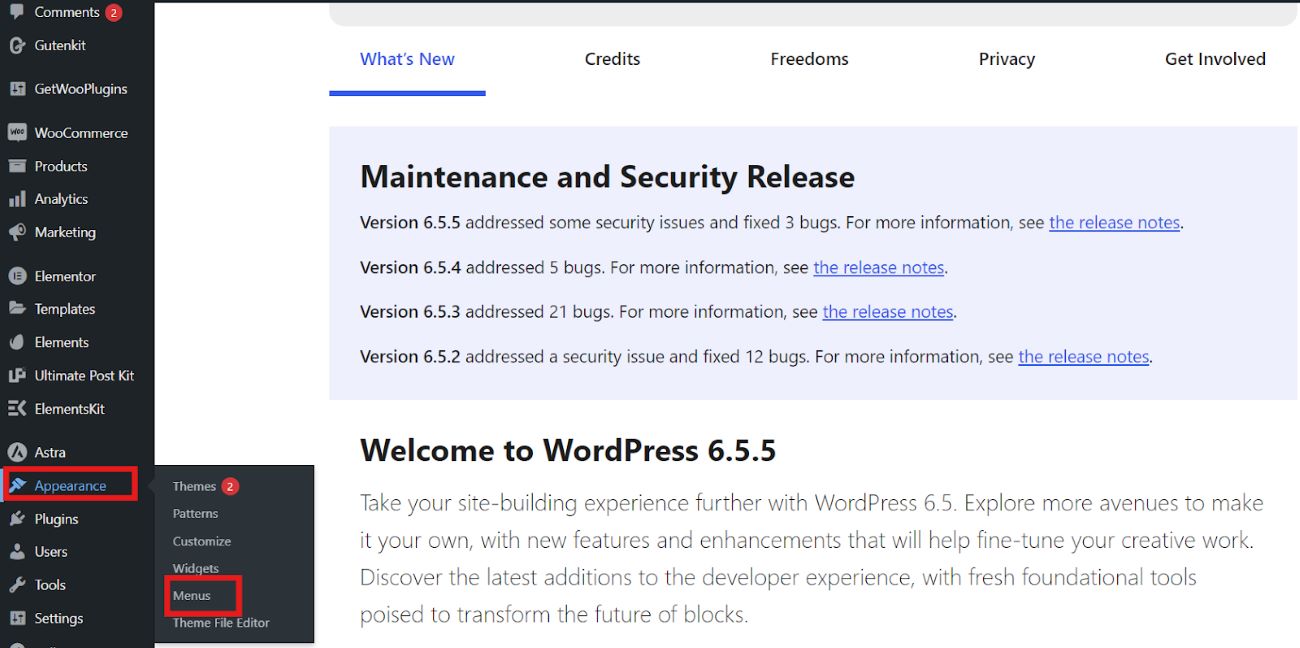
After you create and publish your new page, navigate to your menu appearance settings.
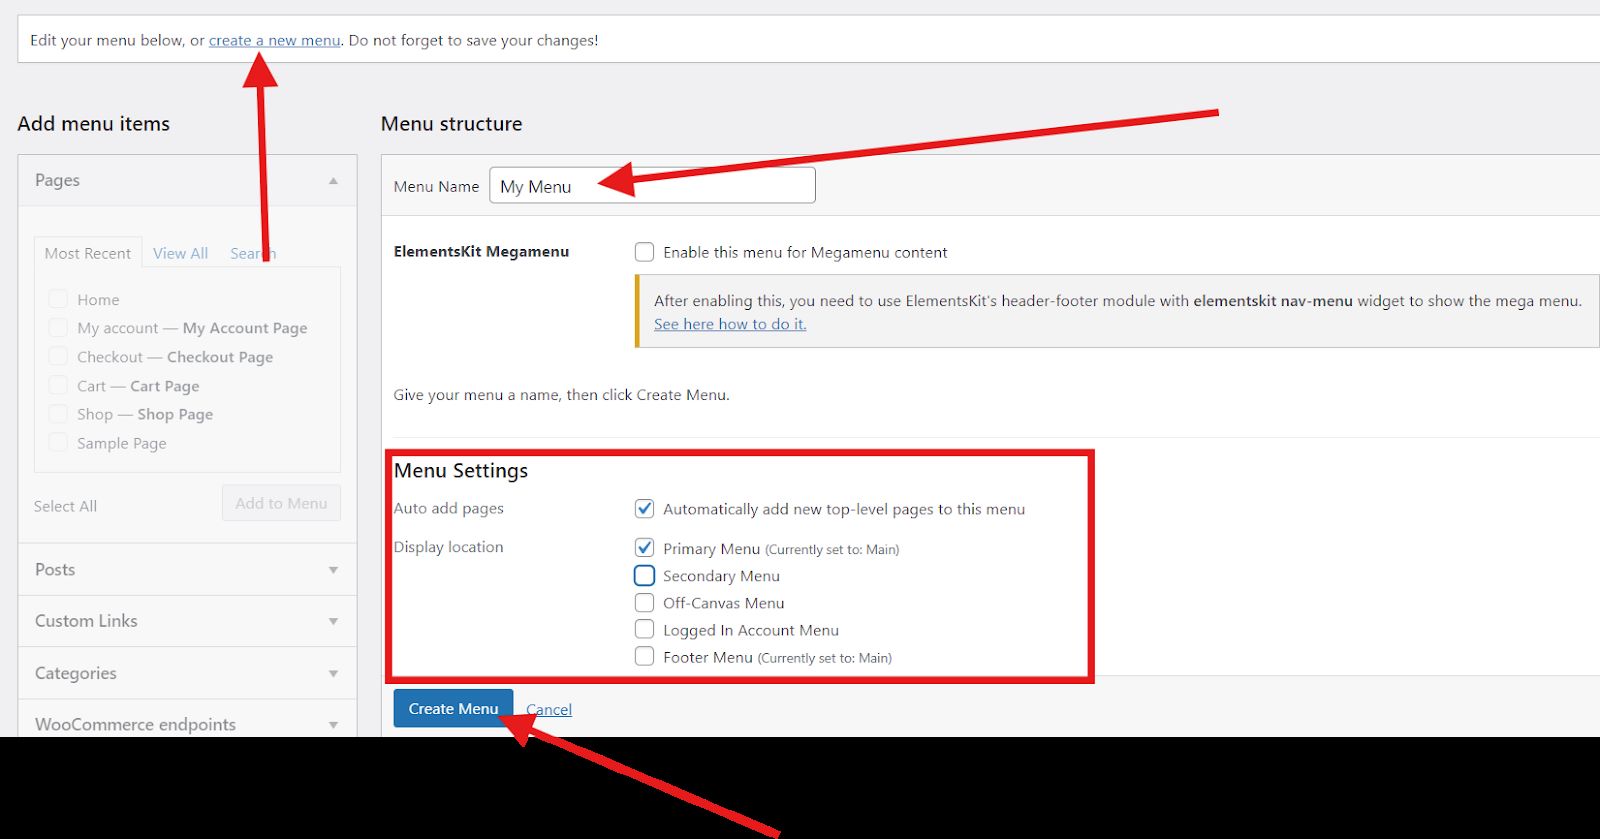
Now, click on “Create a New Menu” and enter the name of your new menu. Then, set your menu settings. After that, click on the “Create Menu” button.
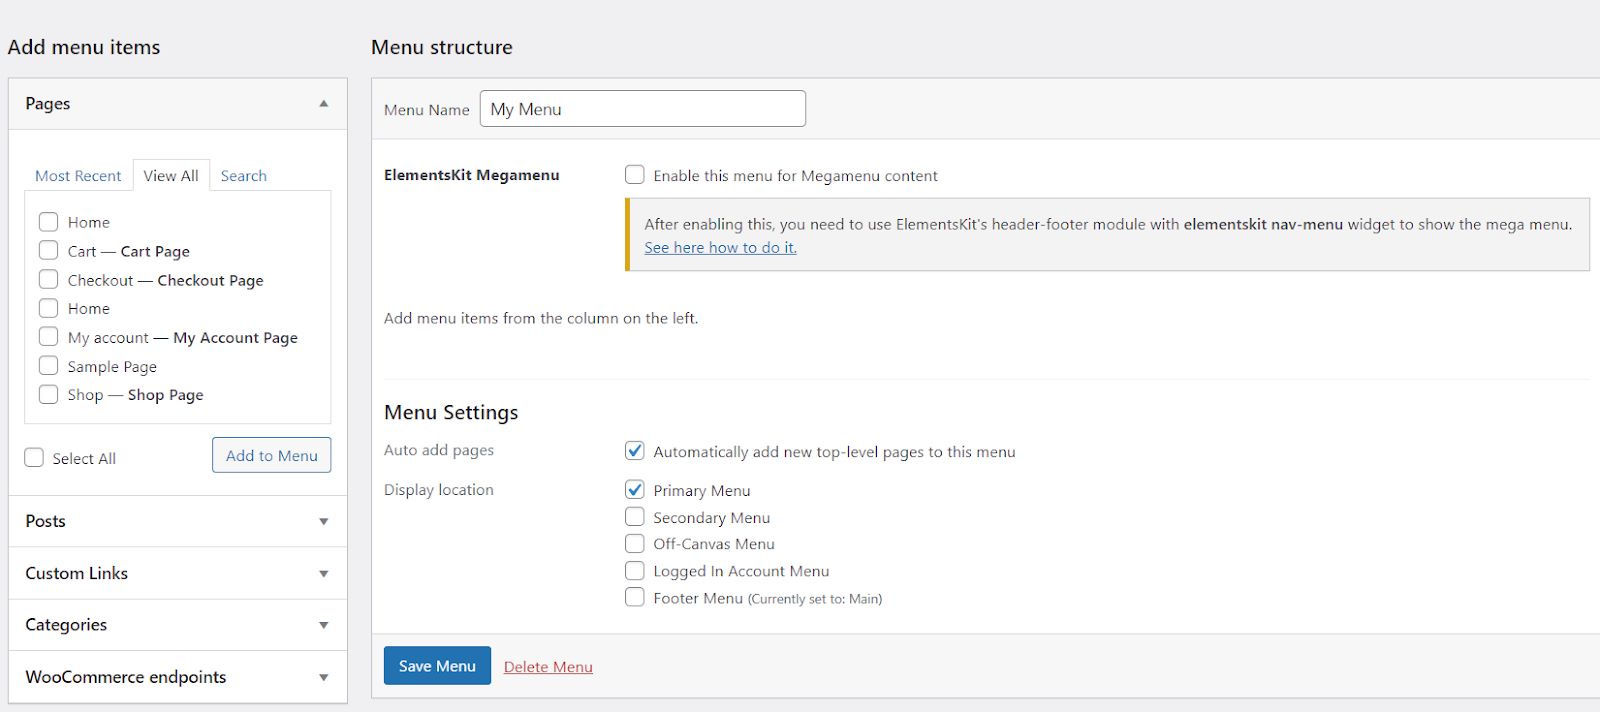
Once you create your new menu, you will be directed to a page where you can add menu items.
What if you already have an existing WordPress menu and you only want to add a new page to that existing menu?
Go to Appearance and select Menus. You will be directed to a screen where you can edit your menu. Under the Add menu items section, choose Pages and click View All to see all the pages you created. Select the page you want to add to your menu by checking the box before the page and clicking Add to Menu.
In case you want the newly added page to be a sub-menu item, simply drag that page to the right and drop. Finally, click Save Menu to save the changes you made.
Step 3: Add a New Menu Item in WordPress
In the left-hand corner of your screen, you will see the “Add menu items” section. Open “Pages” and select “View All” to see all the pages you created. Now, click on the box before each page of the page you want to add to your WordPress menu.
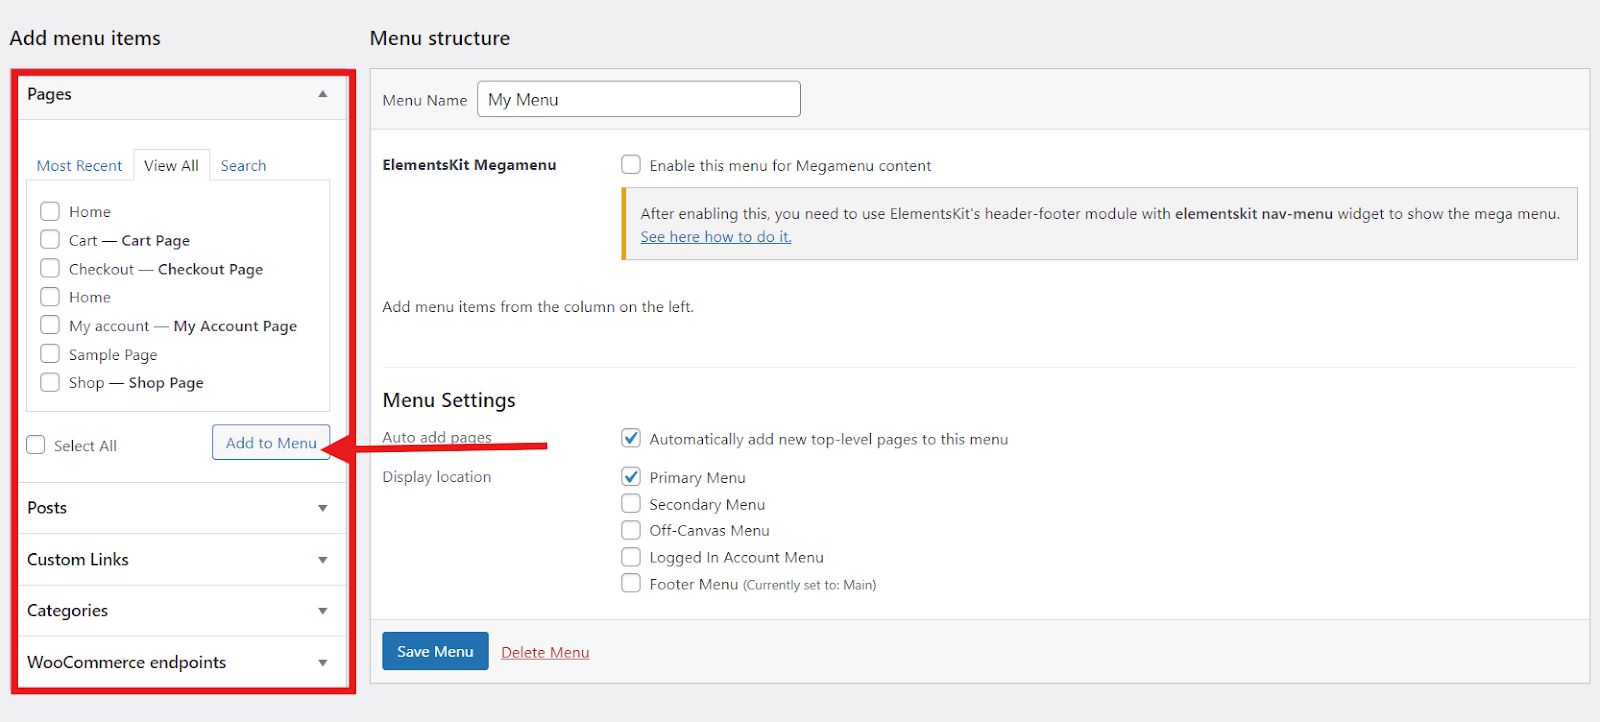
You can also select all if you want all your pages to be added to your menu. Once selected, click on “Add to Menu”.
All the pages you added to your menu will be displayed in the menu structure section.
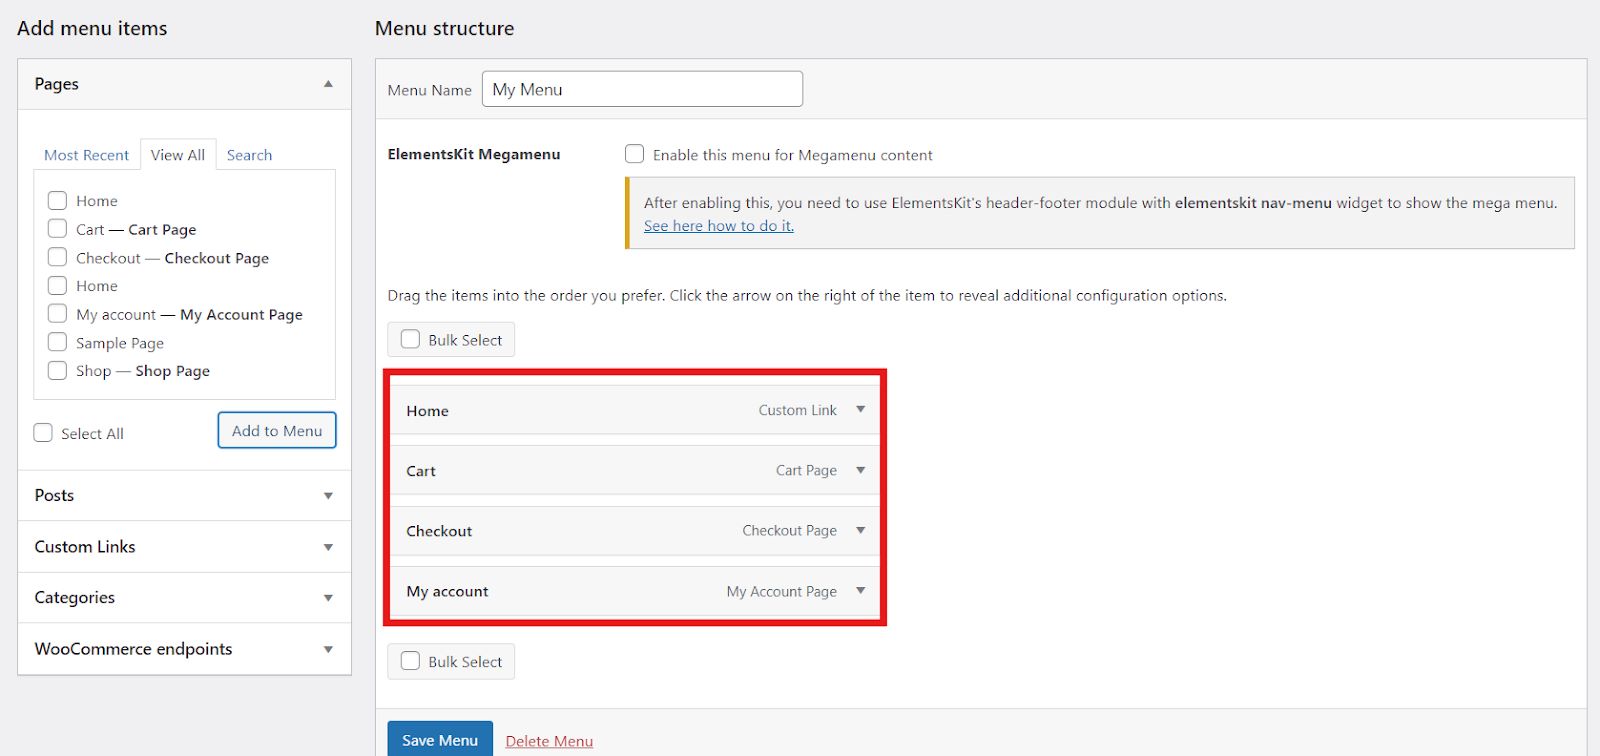
If you want to rearrange your menu items, you can either drag and drop the menu item to the desired position or utilize the drop-down arrow.
Bonus Step: Adding sub-menu items (optional)
What if you want to make a sub-menu item? The way is too simple! You can drag the item to the right and drop it.
Once satisfied, click on the “Save Menu” button.
Method 2: Adding Pages to WordPress Menu with the Site Editor
There’s no single “best” method, as the most suitable method depends on your needs and comfort level. Block-based themes come with a built-in site editor that allows a more visual approach to managing your website’s layout, including menus.
The specific steps might vary depending on your theme, but the general process involves:
Of course, the first step is the same as the first method. Once you have created a new page you want to add to your menu, go to Appearance and select Editor.
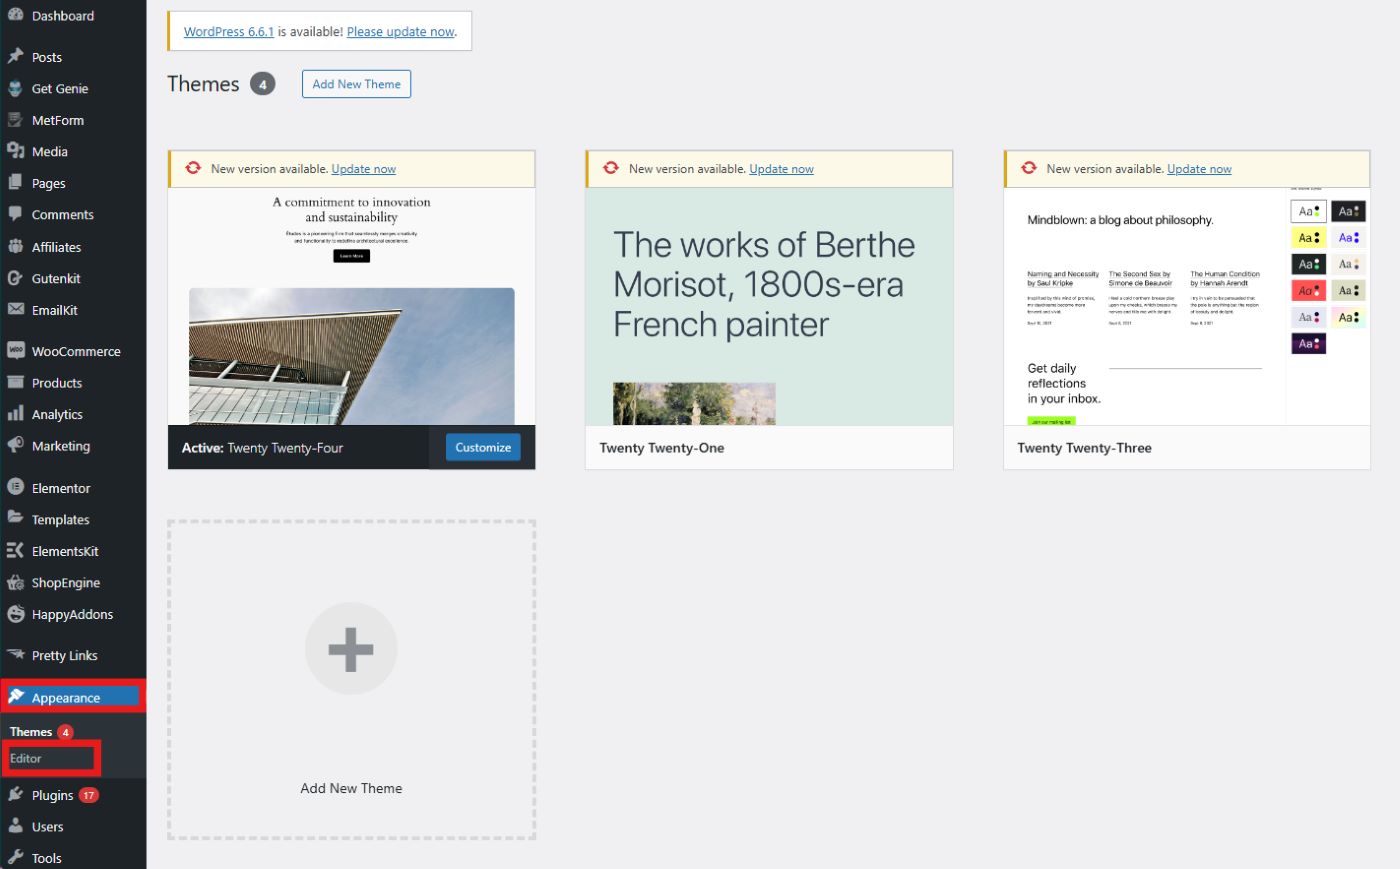
Select Navigation to open the navigation menu.
Now, click on the pencil icon to open your editor screen, where you can add a page to your WordPress menu.
At the top corner, your navigation menu will appear.
To add a new page to your menu, click on the plus (+) icon. You can either search for the page name or enter the URL of the new page you want to add.
If you wish to add a new page as a sub-menu item, simply select the menu item. Then, look for the submenu icon in the toolbar.
Add the link to the page by searching the page name or entering the URL. You can add as many submenu items as you want by clicking on the plus icon.
Bonus: Best Way to Add Nav Menu in WordPress
For a convenient way of adding a nav menu and better WordPress menu customization, it is recommended to use plugins like GutenKit and ElementsKit.
GutenKit is the best option for Gutenberg block editor users. While EkementsKit is the best option for Elementor users.
Let’s explore how these plugins elevate your WordPress navigation menu.
👍 Effortless Menu Creation: Drag-and-drop functionality makes adding and arranging menu items a breeze within the Gutenberg editor.
👍 Submenu Management: Create well-organized navigation structures with the ability to build nested submenus.
👍 Mobile-Responsive Menus: GutenKit ensures your menus adapt seamlessly to different screen sizes, providing a smooth user experience on all devices.
👍 Mega Menu Builder: Craft impressive mega menus that showcase a wider range of content categories and options. ElementsKit provides the tools to structure and design these comprehensive menus.
👍 Widget Integration: Enhance your menus by incorporating various widgets offered by ElementsKit. Imagine adding social media icons, contact information, or even search bars directly within your navigation menu!
👍 Styling Freedom: ElementsKit empowers you to customize the look and feel of your menus. Control fonts, colors, and layouts to match your website’s aesthetic perfectly.
FAQs
Q: Can I add external links to my menu?
A: Absolutely! In the “Pages” section, when creating your menu, you can choose “Custom Links” instead of a page. Enter the desired URL and navigation label for your external link.
Q: How do I create a sub-menu?
A: When adding a page to your menu, simply drag and drop it, slightly indented under another menu item. This creates a hierarchical sub-menu structure.
Q: Can I add posts or categories to my menu?
A: Yes! In addition to pages, you can also add posts, categories, custom links, and other elements to your WordPress menus.
Q: My page isn’t showing up in the menu after I added it.
A: Double-check that the page is published and not set to draft status. Additionally, ensure the menu you added the page to is assigned to a specific location on your website.
Q: How can I create a dropdown menu?
A: In the dashboard menu section, you can create submenus by dragging a page slightly to the right and creating an indent under another menu item. This will create a drop-down menu when you hover over the parent item.
Final Thoughts
Adding a page to the WordPress menu is a straightforward process. While both methods work effectively, using the site editor often provides a more intuitive and visual approach, especially for beginners.
However, if you are looking for seamless navigation menu creation, opt for plugins like GutenKit and ElementsKit. This makes editing or adding a new page to your WordPress menu easier with high customization options.
Remember, a well-structured menu is key to a positive user experience on your WordPress site.
Leave a Reply