Mega menus are all the rage in web design these days. They allow you to create comprehensive navigation systems with multiple levels of submenus, perfect for websites with a lot of content or complex structures.
But how do you add a mega menu to your WordPress site? This guide will walk you through everything you need to know on how to create a mega menu in WordPress!
What is a Mega Menu?
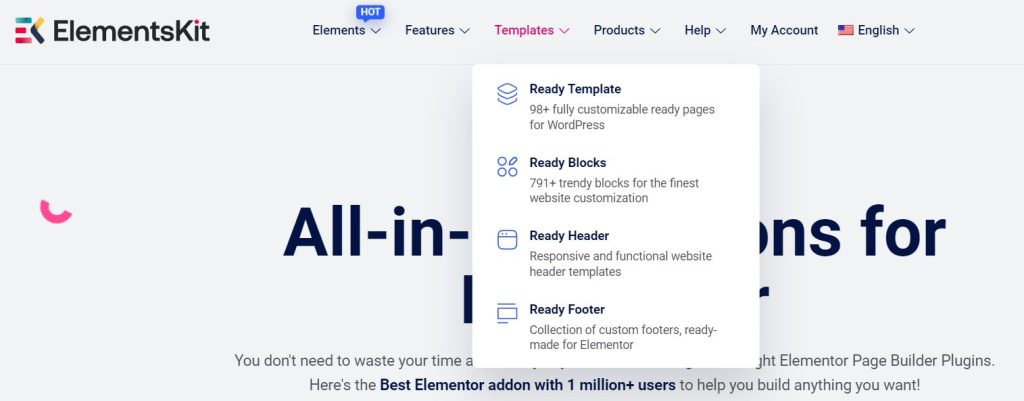
A mega menu is a type of dropdown menu that expands to reveal a grid of links and information. It goes beyond the traditional single-level dropdown by offering a more organized and user-friendly way to navigate websites with extensive content categories.
You can think of it as a super-powered navigation bar that keeps all your important links accessible in a visually appealing way.
Now, there are 2 orientations on how you want to display your navigation menu — Horizontal and Vertical. Let’s take a look at how they vary from each other:
| Feature | Horizontal Mega Menu | Vertical Mega Menu |
|---|---|---|
| Orientation | Horizontal | Vertical |
| Position on webpage | Top | Left/Right side |
| Subcategory display | Grid format | Column format |
| Scrolling for navigation | Less scrolling | More scrolling |
| Screen space usage | Occupies horizontal space | Saves horizontal space |
| Suitability for options | Large number of categories | Moderate number of categories |
Why Do You Need a Mega Menu for Your WordPress Site?
Here are some compelling reasons to consider using a mega menu on your WordPress site:
- Improved User Experience: Mega menus make it easier for users to find what they’re looking for by providing a clear overview of your website’s content structure.
- Enhanced Navigation: With a mega menu, you can organize a large number of pages and categories into a logical and accessible format.
- Increased Visibility: Mega menus allow you to showcase more content categories and calls to action within your navigation bar, potentially leading to higher engagement.
- Boosted SEO: Mega menus can improve your website’s internal linking structure, which can be beneficial for search engine optimization.
How to Create a Mega Menu in WordPress: Step-by-Step
There are two main ways to create a mega menu in WordPress: manual coding and the use of a plugin.
1. Creating Mega Menu Manually by Coding
This method requires proficiency in HTML, CSS, and potentially JavaScript. This approach recommends the creation of a child theme. You’ll need to create separate files for HTML, CSS, and JavaScript codes to implement the mega menu functionality and style it to match your website’s design. While it offers complete control, this approach can be complex and time-consuming for beginners.
So, if you love the thrill of coding, here’s how you can create your mega menu. But, before diving into the code, let’s establish a basic understanding of a mega menu’s structure. Typically, a mega menu consists of:
- Top-level menu items: These are the main categories displayed in the horizontal navigation bar.
- Submenus: When a user hovers over a top-level item, a submenu unfolds, revealing nested links for further exploration.
- Dropdown content: This can include additional links, images, icons, or even short descriptions to provide a clear overview of what each submenu offers.
HTML Scaffolding
Let’s lay the foundation with some HTML. You’ll need to create a new template file specifically for your mega menu within your child theme directory. This file acts as a container for your HTML code.
Next, create an unstyled menu structure with nested elements to represent the top-level menu items and their corresponding submenus with <a> anchor tags.
Here’s a sample of HTML code:
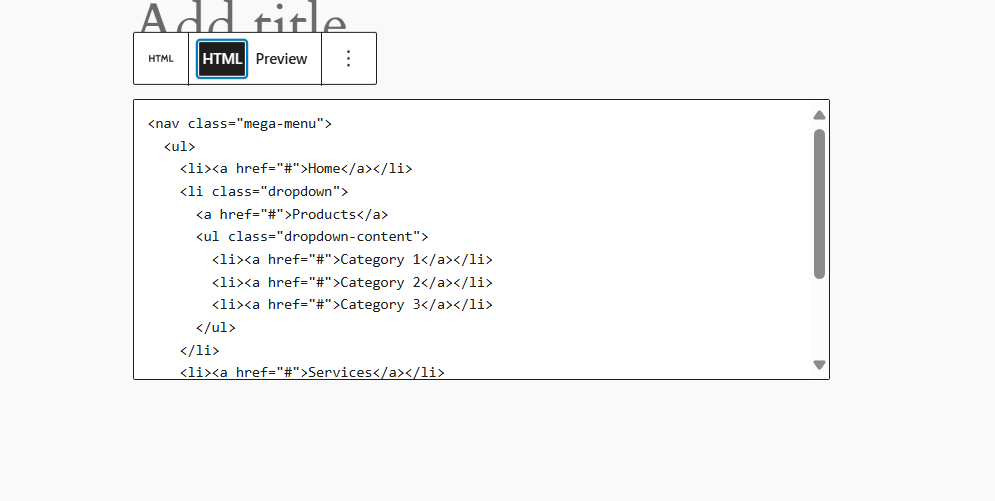
In this code, a <nav> element is to contain the navigation menu. Inside it, an unordered list (<ul>) with list items (<li>) for each top-level menu item. Each list item containing a submenu has a nested unordered list with its submenu links.
CSS Styling for the Mega Menu
Now comes the fun part – transforming this basic structure into a visually appealing mega menu. We’ll use CSS to style the menu, focusing on positioning, hover effects, and overall aesthetics.
Here’s a foundational CSS snippet to get you started:
Enter the css styling code in your child theme directory. Here are the 2 main ways:
- Add your CSS code at the bottom of the style.css file within your child theme directory. If there is no existing style.css file, you’ll need to create one and enter your customized code.
- Paste your CSS code in the custom CSS section in the theme options or customizer menu.
Bringing it to Life: Adding Interactivity with JavaScript
While CSS provides the foundation for styling, JavaScript injects interactivity. We can use JavaScript to detect hover events and toggle the visibility of dropdown menus. Here’s a basic implementation:
This code selects all list items (<li>) within the navigation menu, then adds event listeners for both mouseenter and mouseleave events. When the mouse enters a menu item, the corresponding dropdown (identified using querySelector) is assigned a class of “show” (defined in your CSS to display the dropdown). Conversely, when the mouse leaves, the class is removed, hiding the dropdown.
To apply your javascript code, you will need to create a script.js file (if not existing) and enter the code. Then, open your child theme’s functions.php and add the code shown in the image below to enqueue the script.js file:
2. Creating Mega Menu Using a Plugin (Easier Method)
Using a plugin in creating your mega menu is the easiest method. You can add a mega menu using a page builder like ElementsKit and a Gutenberg block plugin using GutenKit. These 2 plugins are the best option for your website mega menu.
Here’s why:
⚡ An addon specifically designed for Elementor page builder, which means that ElementsKit is designed for Elementor users.
⚡Creates and customizes mega menus visually using Elementor’s drag-and-drop interface.
⚡Provides pre-designed templates as your starting point, saving you much time.
⚡Easy to use and offers full control over layout, styling, and content within the mega menu.
⚡GutenKit leverages the familiar Gutenberg block editor, which makes the mega menu creation process smoother, especially if you’re comfortable with Gutenberg.
⚡GutenKit offers a good range of customization options. You can design multi-column layouts, incorporate images, logos, and even use other Gutenberg blocks within your mega menu.
Here’s a look at how to use two popular options:
Creating Mega Menu Using ElementsKit
ElementsKit Mega Menu is Elementor based that offers various customization options. This feature doesn’t require a coding skill and even seamlessly works with WooCommerce.
So, if you want a user-friendly way to create a mega menu with Elementor, ElementsKit is definitely yours!
But of course, you have to make sure that you have your Elementor and ElementsKit installed in your WordPress site.
Let’s deep dive!
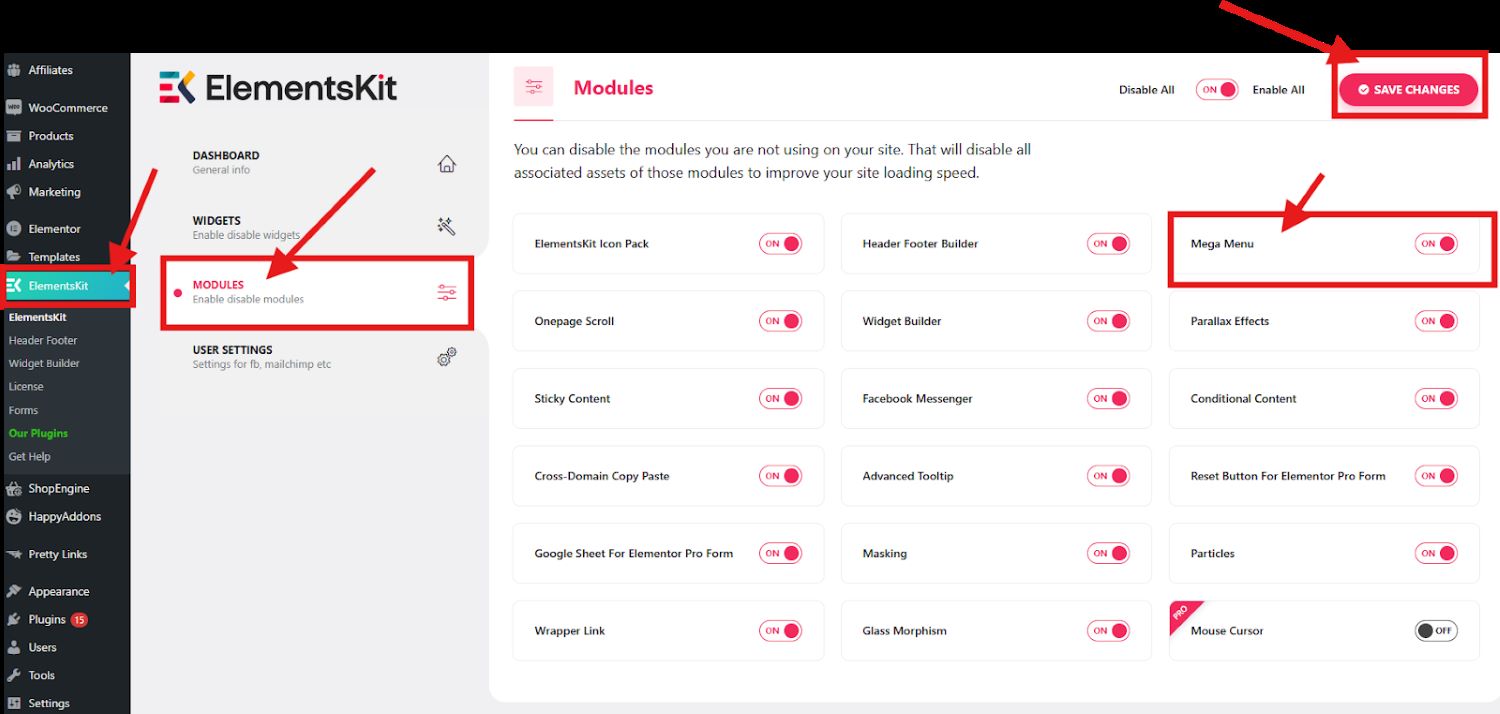
First, enable the Elementor Mega Menu by going to ElementsKit in your WordPress dashboard. Open the Module and look for Mega Menu, then turn it on and save changes.
Step 1: Configuring your Menu
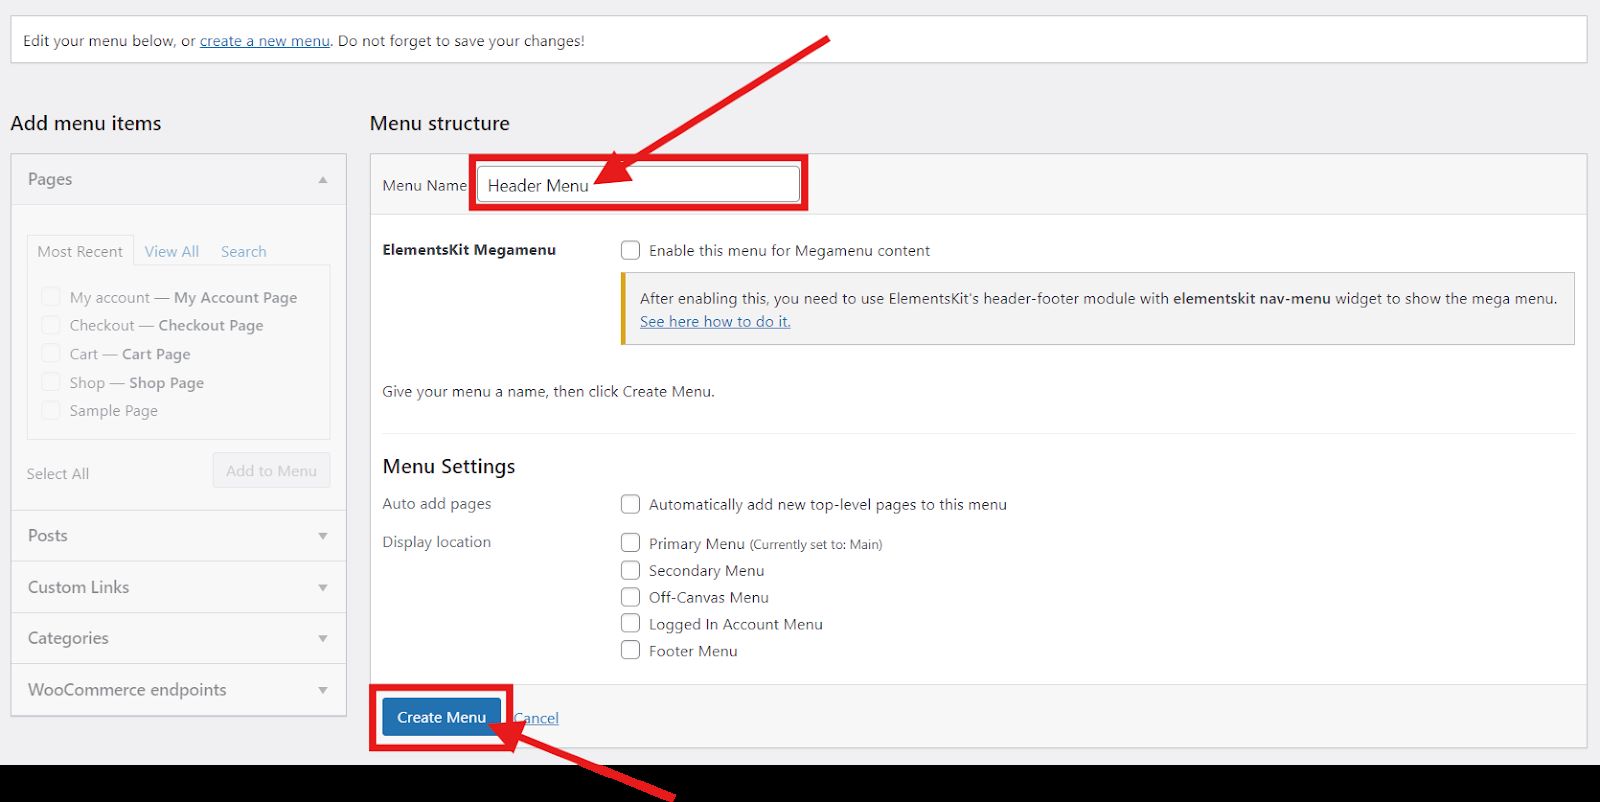
In your dashboard, proceed to Appearance and open Menus to create a New Menu.
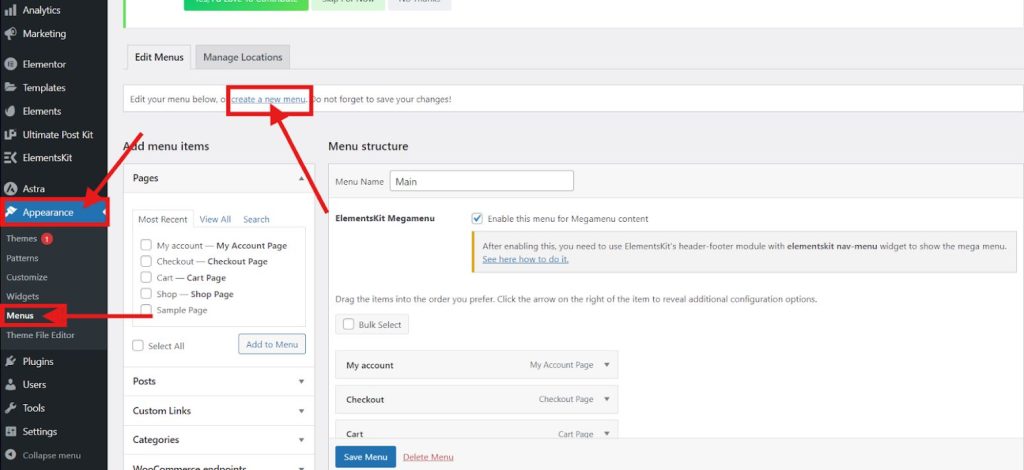
Enter the name of your menu and hit the Create Menu button.
In add items in your mega menu, simply complete these steps:
- On the right column, expand the Custom Links section.
- Enter the URL and the Link Text.
- Hit Add to Menu
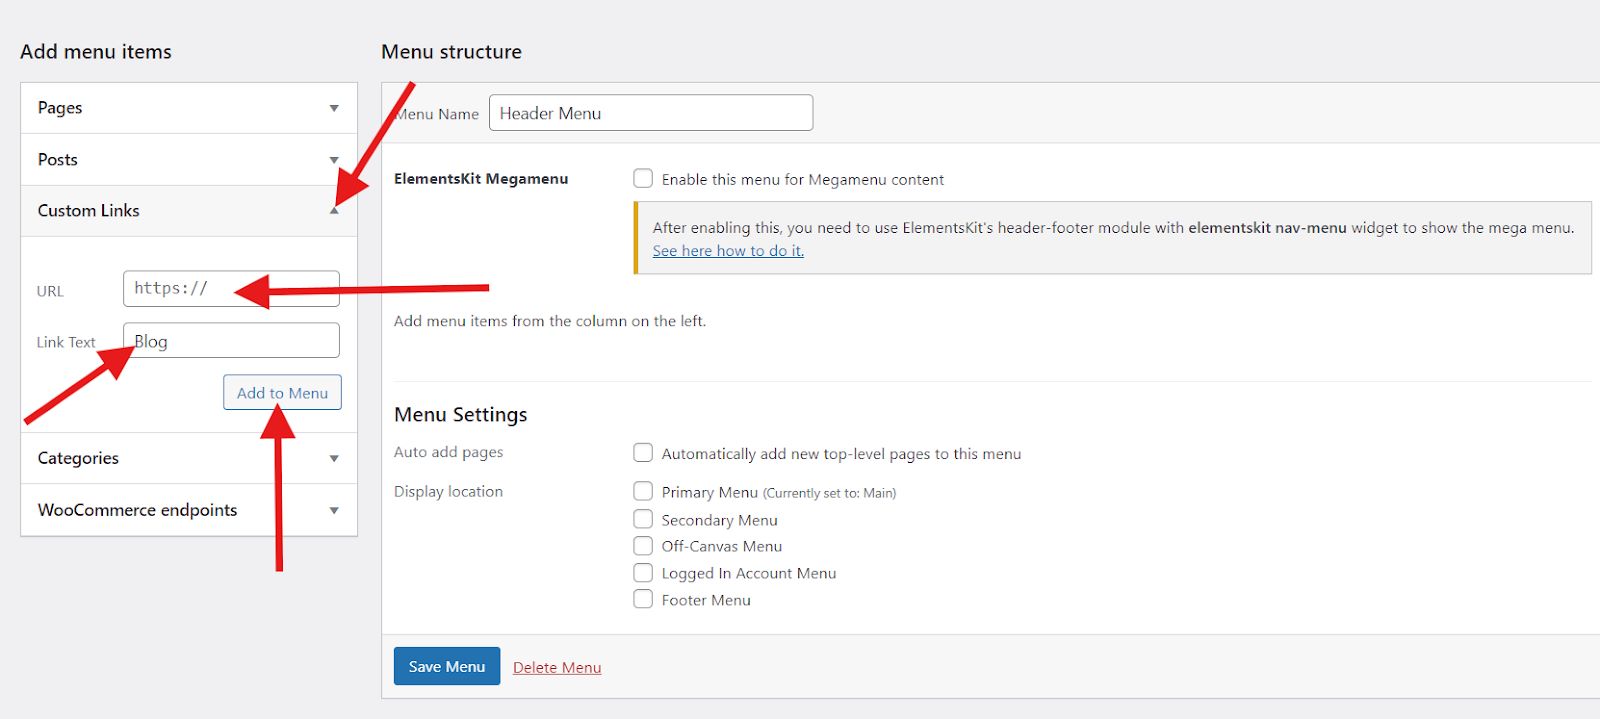
Check the checkbox for “Enable this menu for Megamenu content”. When the mega menu is enabled, you will see the mega menu settings icon when you hover on the menu items.
Step 2: Customizing Mega Menu Content
Upon clicking on the mega menu settings icon, a popup will appear where you are required to fulfill these steps:
- Toggle button to enable Mega Menu.
- Click on the Save button.
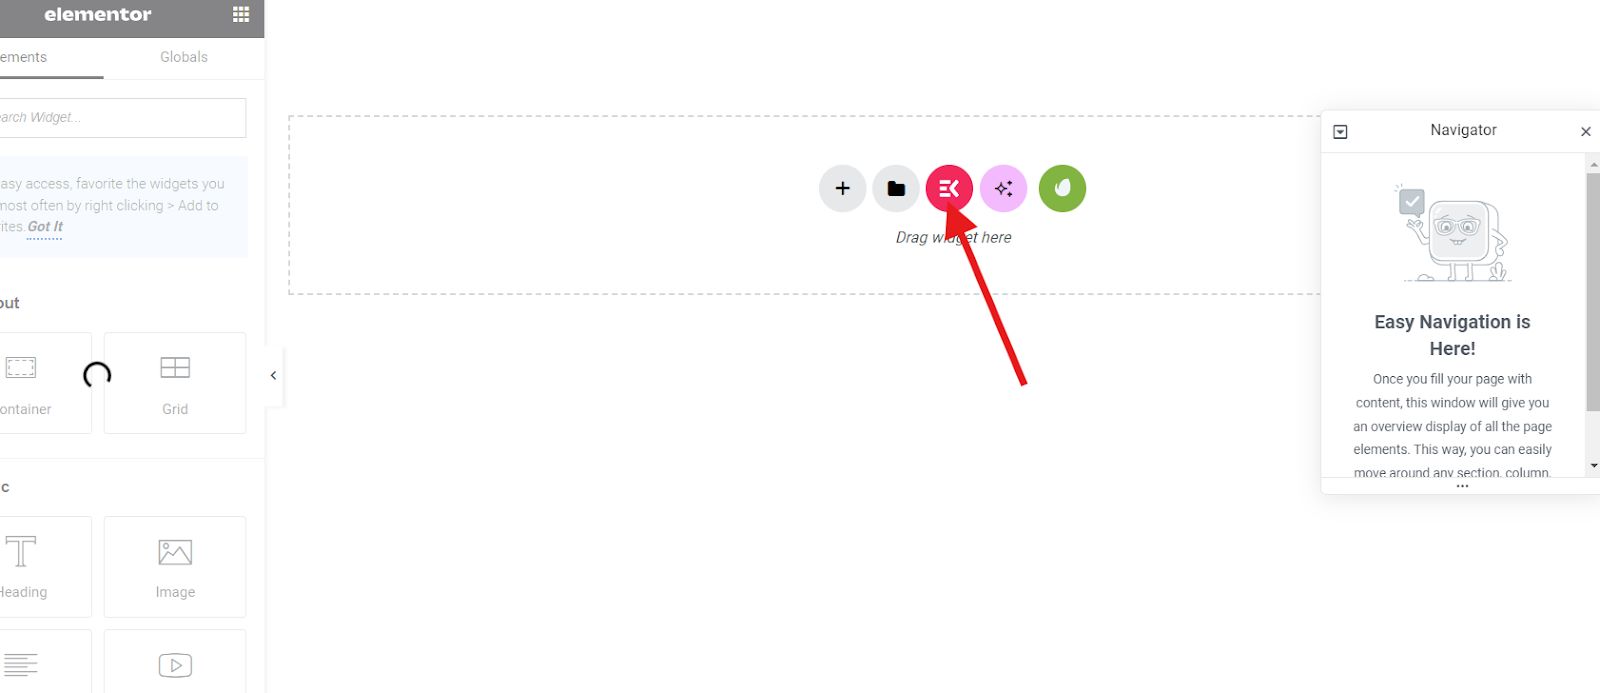
- After that click the EDIT MEGAMENU CONTENT button. It’ll take you to the Elementor editor button.
After that, click on the ElementsKit Template Library Icon.
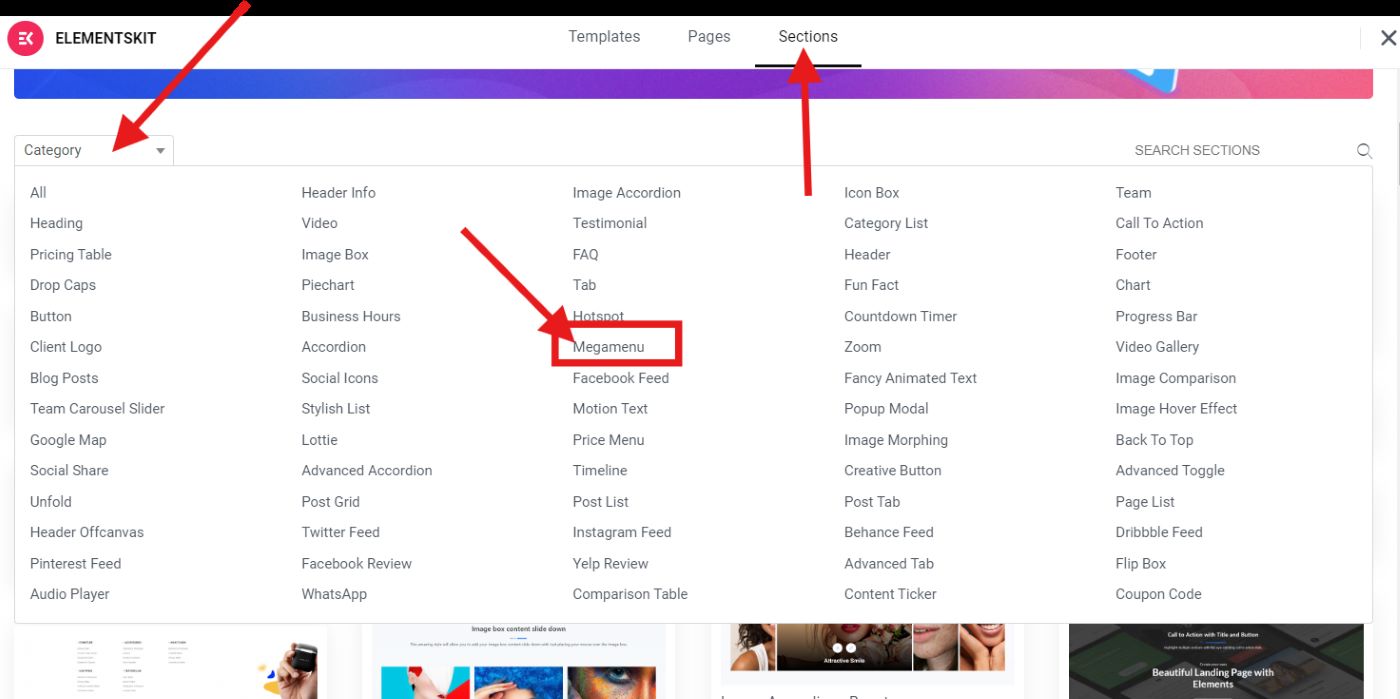
Then, go to Sections —> Click on the Category —> Select Megamenu from the list.
Next, insert any Mega Menu Content.
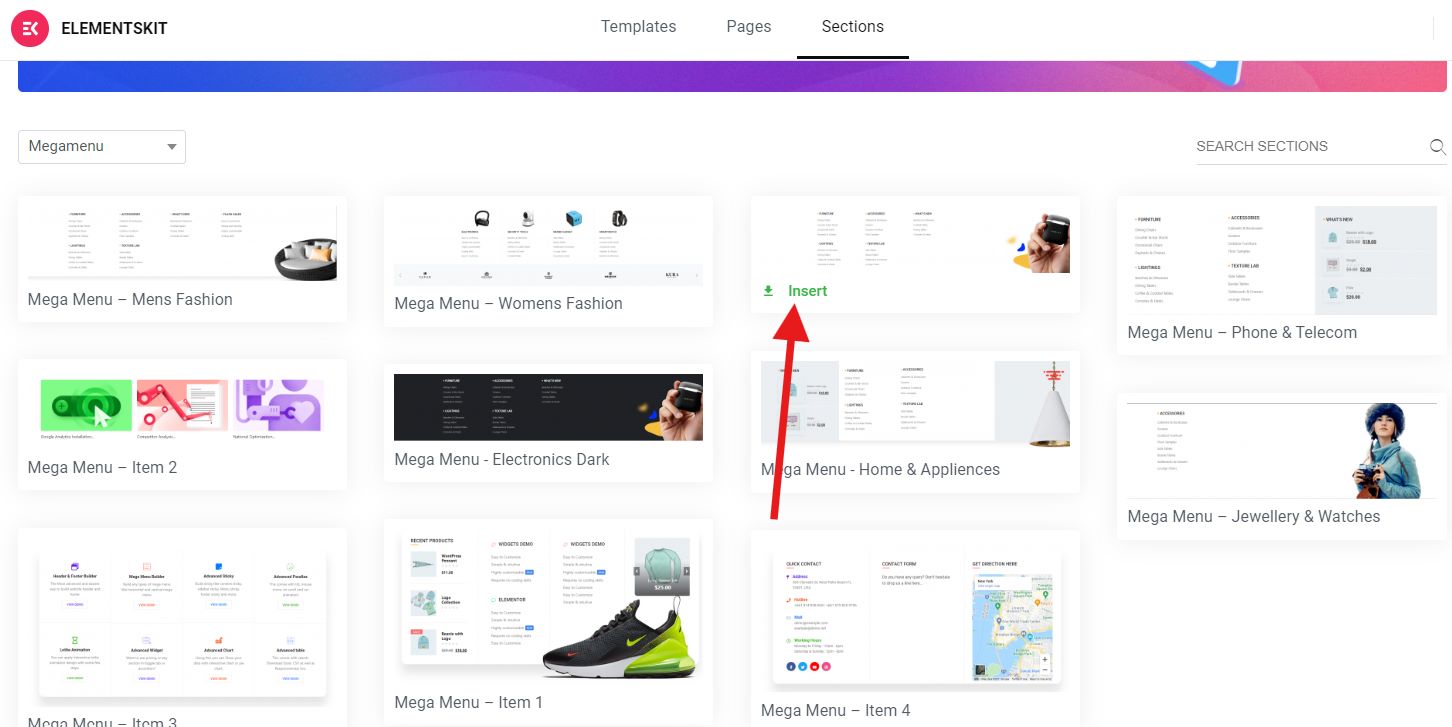
Once you added all the Mega Menu Contents, that is the time you can take full control on the customization of your Mega Menu. You can set your desired width, gap, height, position, and even your HTML tag.
What’s more special with the ElementsKit Mega Menu feature? This feature offers users the freedom to make the Mega Menu more aesthetic by the option to customize the following:
- Heading Text
- Icon
- Badge
- Default Settings
and so on……
Making your Mega Menu more aesthetic doesn’t stop from deciding its default settings. You can still do more by designing your Header Template.
Step 3: Creating your Header Template
In your dashboard, navigate to ElementsKit again and choose Header Footer. Click Add new and a popup will appear.
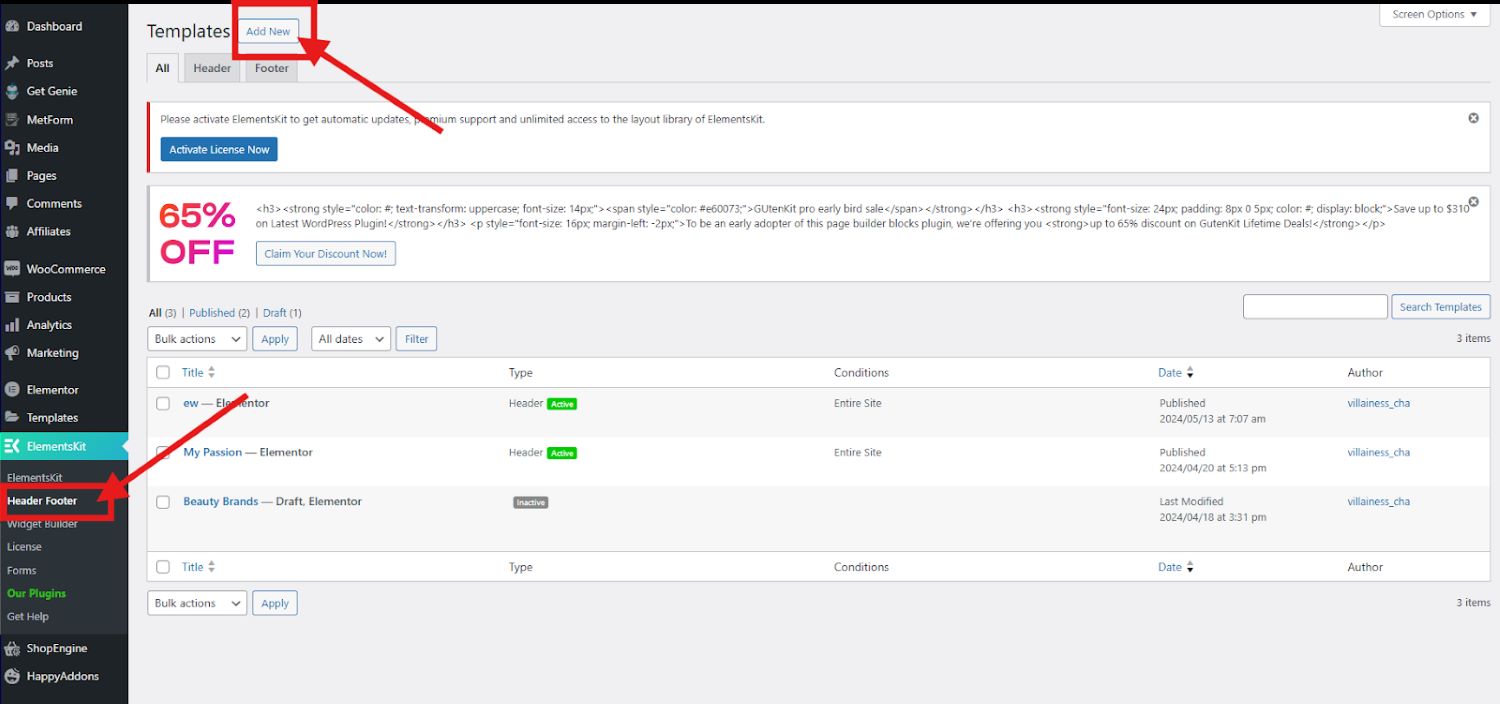
In the popup box, complete the following fields:
- Title (Header)
- Type (Header)
- Condition (Entire Site)
- Activation
Click on Edit With Elementor so that you will be directed to a page to start designing your header template. Then, select the structure of your template.
Search for the Nav menu, then drag and drop it. Make sure to select the Nav Menu that has the EKit badge. Otherwise, the mega menu you created will not appear.
Next, go to menu settings and select from the dropdown the header menu you created. Feel free to incorporate any widget from this selection to tailor your header template to your liking.
After following all the steps, please check the final outcome of your mega menu to determine if the design is for your liking and for any adjustments.
Creating Gutenberg Mega Menu Using GutenKit
Another way of creating your Mega Menu is through the Gutenberg editor. While many plugins are intended for the Gutenberg editor, GutenKit is the most ideal plugin because of its very user-friendly interface.
Here’s how the Mega Menu feature of GutenKit works:
To start with, make sure you install the GutenKit pro. After that, open a new page or existing page. In your editor page, click on the plus (+) icon to add the Nav menu block.
Once the Nav menu block is added, click on the menu item. On the right side, the block setting will appear. Toggle Add Sub Menu so that you can select the Mega Menu as Submenu Type.
Click on the plus (+) icon to add the submenu. Once added, adjust the menu width and the menu position. Under the Submenu Indicator, add your submenu indicator icon which you can select from the icon library or upload SVG. You can customize your icon based on your preference.
That’s one way of adding a mega menu. At this time, we will show you another way of adding it.
Select the menu item and a tool box will appear. Click on the 3 lines to add a mega menu.
Pretty easy right?
FAQs
Q: Can I use a mega menu with any WordPress theme?
A: While most themes should work with mega menu plugins, it’s always a good idea to check the plugin’s documentation for compatibility.
Q: Does ElementsKit impact site speed negatively?
A: Absolutely not. ElementsKit is engineered for optimal performance, delivering streamlined and optimized code.
Q: Is ElementsKit compatible with any theme?
A: Certainly! ElementsKit seamlessly integrates with any theme of your choice. We’ve thoroughly tested our plugin with all the popular themes available and no issues occurred.
Q: Will GutenKit affect the website’s performance?
A: Definitely not. GutenKit is a lightweight plugin with cleaner codes that helps you to build faster-loading web pages.It efficiently loads the CSS and JavaScript codes only for the elements in use to reduce the loading delay. In fact, inline SVG icons can help to improve website performance.
Q: Are there any specific themes that are compatible with GutenKit?
A: GutenKit seamlessly integrates with all themes adhering to WordPress Theme Development Standards. Whether it’s a block theme or a traditional one, you can effortlessly incorporate GutenKit into your website.
Final Thoughts
Mega menus offer a powerful way to enhance your website’s navigation and user experience, especially for content-rich websites. You may opt for manual coding if you are familiar and experienced with coding or go with the easiest method using a plugin in creating a mega menu.
If you prefer the use of plugin, you have 2 options based on user’s comfort. If you are an Elementor user, you should explore ElementsKit. On the other hand, GutenKit is worth exploring if you are comfortable working with the Gutenberg editor.
So, what are you waiting for? Start building your mega menu today with ElementsKit or GutenKit!
Leave a Reply